Brother International ADS-3000N Users Guide - Page 214
Scan Options Using the Touchscreen (ADS-2800W / ADS-3600W), Skip Blank Function
 |
View all Brother International ADS-3000N manuals
Add to My Manuals
Save this manual to your list of manuals |
Page 214 highlights
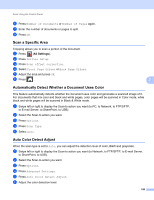
Scan Using the Control Panel Scan Options Using the Touchscreen (ADS-2800W / ADS-3600W) 7 Skip Blank Page Function 7 Set Skip Blank Page to On to remove blank pages of the document from the scanning results. The sensitivity of the Skip Blank Page function can be adjusted with the slider. Moving the slider toward "High" will make the scanner more likely to skip pages, while moving it toward "Low" will make the scanner less likely to skip pages. 1 Swipe left or right to display the Scan-to action you want (to PC, to Network, to FTP/SFTP, to E-mail Server, to SharePoint, to USB). 2 Press Options. 3 Press Skip Blank Page. 4 Press On (or Off). 7 Adjust the Scanning Position 7 You can adjust the position at which documents are scanned if the output position of images shifts or if images are squeezed together or stretched out vertically. 1 Swipe left or right to display the scan-to action you want (to Network, to FTP/SFTP, to E-mail Server, to SharePoint, to USB). 2 Press Options. 3 Press Advanced Settings. 4 Press Margin Settings. 5 Select -3 to 3. 6 Press OK. Split a Scanned File and Save 7 When multiple documents have been scanned, you can split up and save documents separately by using this function. You can also set the number of pages to split a document by. 1 Swipe left or right to display the scan functions (to Network, to FTP/SFTP, to Email Server, to SharePoint, or to USB). 2 Press Options. 3 Press Document Separation. 4 Press Document Separation again. 5 Press Number of Documents or Number of Pages. 198
-
 1
1 -
2
-
3
-
4
-
5
-
6
-
7
-
8
-
9
-
10
-
11
-
12
-
13
-
14
-
15
-
16
-
17
-
18
-
19
-
20
-
21
-
22
-
23
-
24
-
25
-
26
-
27
-
28
-
29
-
30
-
31
-
32
-
33
-
34
-
35
-
36
-
37
-
38
-
39
-
40
-
41
-
42
-
43
-
44
-
45
-
46
-
47
-
48
-
49
-
50
-
51
-
52
-
53
-
54
-
55
-
56
-
57
-
58
-
59
-
60
-
61
-
62
-
63
-
64
-
65
-
66
-
67
-
68
-
69
-
70
-
71
-
72
-
73
-
74
-
75
-
76
-
77
-
78
-
79
-
80
-
81
-
82
-
83
-
84
-
85
-
86
-
87
-
88
-
89
-
90
-
91
-
92
-
93
-
94
-
95
-
96
-
97
-
98
-
99
-
100
-
101
-
102
-
103
-
104
-
105
-
106
-
107
-
108
-
109
-
110
-
111
-
112
-
113
-
114
-
115
-
116
-
117
-
118
-
119
-
120
-
121
-
122
-
123
-
124
-
125
-
126
-
127
-
128
-
129
-
130
-
131
-
132
-
133
-
134
-
135
-
136
-
137
-
138
-
139
-
140
-
141
-
142
-
143
-
144
-
145
-
146
-
147
-
148
-
149
-
150
-
151
-
152
-
153
-
154
-
155
-
156
-
157
-
158
-
159
-
160
-
161
-
162
-
163
-
164
-
165
-
166
-
167
-
168
-
169
-
170
-
171
-
172
-
173
-
174
-
175
-
176
-
177
-
178
-
179
-
180
-
181
-
182
-
183
-
184
-
185
-
186
-
187
-
188
-
189
-
190
-
191
-
192
-
193
-
194
-
195
-
196
-
197
-
198
-
199
-
200
-
201
-
202
-
203
-
204
-
205
-
206
-
207
-
208
-
 209
209 -
 210
210 -
 211
211 -
 212
212 -
 213
213 -
 214
214 -
 215
215 -
 216
216 -
 217
217 -
 218
218 -
 219
219 -
220
-
221
-
222
-
223
-
224
-
225
-
226
-
227
-
228
-
229
-
230
-
231
-
232
-
233
-
234
-
235
-
236
-
237
-
238
-
239
-
240
-
241
-
242
-
243
-
244
-
245
-
246
-
247
-
248
-
249
-
250
-
251
-
252
-
253
-
254
-
255
-
256
-
257
-
258
-
259
-
260
-
261
-
262
-
263
-
264
-
265
-
266
-
267
-
268
-
269
-
270
-
271
-
272
-
273
-
274
-
275
-
276
-
277
-
278
-
279
-
280
-
281
-
282
-
283
-
284
-
285
-
286
-
287
-
288
-
289
-
290
 |
 |
