Brother International ADS-3000N Users Guide - Page 89
Scan To Button, Display Name, Pin number, Retype Pin, number, ADS-2800W / ADS-3600W
 |
View all Brother International ADS-3000N manuals
Add to My Manuals
Save this manual to your list of manuals |
Page 89 highlights
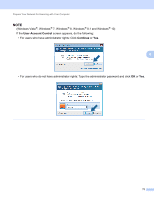
Prepare Your Network for Scanning with Your Computer 4 Click the Scan To Button tab and type your computer name in the Display Name field. The Touchscreen displays the name you enter. The default setting is your computer name. Enter any name that you like. 4 5 (ADS-2800W / ADS-3600W) To avoid receiving unwanted documents, type a four-digit PIN in the Pin number and Retype Pin number fields. To send scanned data to a computer protected by a PIN, the Touchscreen prompts you to enter the PIN before the document can be scanned and sent to the computer. 73
-
 1
1 -
2
-
3
-
4
-
5
-
6
-
7
-
8
-
9
-
10
-
11
-
12
-
13
-
14
-
15
-
16
-
17
-
18
-
19
-
20
-
21
-
22
-
23
-
24
-
25
-
26
-
27
-
28
-
29
-
30
-
31
-
32
-
33
-
34
-
35
-
36
-
37
-
38
-
39
-
40
-
41
-
42
-
43
-
44
-
45
-
46
-
47
-
48
-
49
-
50
-
51
-
52
-
53
-
54
-
55
-
56
-
57
-
58
-
59
-
60
-
61
-
62
-
63
-
64
-
65
-
66
-
67
-
68
-
69
-
70
-
71
-
72
-
73
-
74
-
75
-
76
-
77
-
78
-
79
-
80
-
81
-
82
-
83
-
 84
84 -
 85
85 -
 86
86 -
 87
87 -
 88
88 -
 89
89 -
 90
90 -
 91
91 -
 92
92 -
 93
93 -
 94
94 -
95
-
96
-
97
-
98
-
99
-
100
-
101
-
102
-
103
-
104
-
105
-
106
-
107
-
108
-
109
-
110
-
111
-
112
-
113
-
114
-
115
-
116
-
117
-
118
-
119
-
120
-
121
-
122
-
123
-
124
-
125
-
126
-
127
-
128
-
129
-
130
-
131
-
132
-
133
-
134
-
135
-
136
-
137
-
138
-
139
-
140
-
141
-
142
-
143
-
144
-
145
-
146
-
147
-
148
-
149
-
150
-
151
-
152
-
153
-
154
-
155
-
156
-
157
-
158
-
159
-
160
-
161
-
162
-
163
-
164
-
165
-
166
-
167
-
168
-
169
-
170
-
171
-
172
-
173
-
174
-
175
-
176
-
177
-
178
-
179
-
180
-
181
-
182
-
183
-
184
-
185
-
186
-
187
-
188
-
189
-
190
-
191
-
192
-
193
-
194
-
195
-
196
-
197
-
198
-
199
-
200
-
201
-
202
-
203
-
204
-
205
-
206
-
207
-
208
-
209
-
210
-
211
-
212
-
213
-
214
-
215
-
216
-
217
-
218
-
219
-
220
-
221
-
222
-
223
-
224
-
225
-
226
-
227
-
228
-
229
-
230
-
231
-
232
-
233
-
234
-
235
-
236
-
237
-
238
-
239
-
240
-
241
-
242
-
243
-
244
-
245
-
246
-
247
-
248
-
249
-
250
-
251
-
252
-
253
-
254
-
255
-
256
-
257
-
258
-
259
-
260
-
261
-
262
-
263
-
264
-
265
-
266
-
267
-
268
-
269
-
270
-
271
-
272
-
273
-
274
-
275
-
276
-
277
-
278
-
279
-
280
-
281
-
282
-
283
-
284
-
285
-
286
-
287
-
288
-
289
-
290
 |
 |

Prepare Your Network for Scanning with Your Computer
73
4
4
Click the
Scan To Button
tab and type your computer name in the
Display Name
field. The Touchscreen
displays the name you enter. The default setting is your computer name. Enter any name that you like.
5
(ADS-2800W / ADS-3600W)
To avoid receiving unwanted documents, type a four-digit PIN in the
Pin number
and
Retype Pin
number
fields.
To send scanned data to a computer protected by a PIN, the Touchscreen prompts you to enter the PIN
before the document can be scanned and sent to the computer.