Brother International BAS-343E Instruction Manual - English - Page 45
Wiper adjustment, 9-10. Adjusting the needle up stop position, Standard adjustments
 |
View all Brother International BAS-343E manuals
Add to My Manuals
Save this manual to your list of manuals |
Page 45 highlights
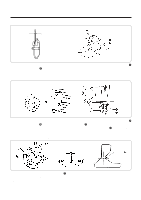
9. Standard adjustments 9-9. Wiper adjustment ˙ For vertical wiper (standard) 112 mm w wy t approx. 2 mm 15 mm Fig. A 1. When the thread wiper solenoid plunger q is driven to the full stroke, the wiper w should be 15 mm in front of the needle center. Loosen screws e and shift the entire solenoid bracket r up or down to adjust. The standard height from the solenoid bracket r bottom to the needle plate top is approximately 112 mm. 2. When the wiper w is operated and aligned with the center of the needle bar, the distance from the wiper w to needle tip should be approximately 2 mm. Loosen screw t and move the wiper w in or out to adjust. As shown in Fig. A, make sure the wiper w does not strike the presser foot y or needle. NOTE Check that the wiper w is not touching the finger guard. 9-10. Adjusting the needle up stop position • The needle up stop position has been adjusted so that the tip of the needle stops 17.5 - 19.5 mm above the top of the needle plate. • If adjustment is necessary, loosen the screw w at the "U" mark of the machine pulley q and adjust the position of the machine pulley q. The machine pulley q stops later if it is turned clockwise, and it stops earlier if it is turned counterclockwise. NOTE • The screw e is used by the needle down detection function and should not be loosened. • The screw r is a screw for detecting the machine stop position, and should not be loosened. • If the index mark is not inside the mark when be displayed (when memory switch No.14 is on).Turn the machine pulley to move the index mark to the correct position and then start the sewing machine. BAS-343E 38
-
 1
1 -
2
-
3
-
4
-
5
-
6
-
7
-
8
-
9
-
10
-
11
-
12
-
13
-
14
-
15
-
16
-
17
-
18
-
19
-
20
-
21
-
22
-
23
-
24
-
25
-
26
-
27
-
28
-
29
-
30
-
31
-
32
-
33
-
34
-
35
-
36
-
37
-
38
-
39
-
 40
40 -
 41
41 -
 42
42 -
 43
43 -
 44
44 -
 45
45 -
 46
46 -
 47
47 -
 48
48 -
 49
49 -
 50
50 -
51
-
52
-
53
-
54
-
55
-
56
-
57
-
58
-
59
-
60
-
61
-
62
-
63
-
64
-
65
-
66
 |
 |
