Brother International Innov-ís 40 Users Manual - English - Page 33
Removing the presser, foot holder
 |
View all Brother International Innov-ís 40 manuals
Add to My Manuals
Save this manual to your list of manuals |
Page 33 highlights
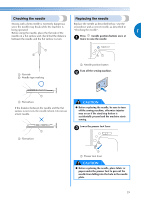
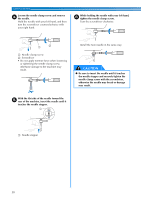
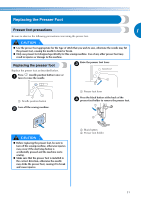
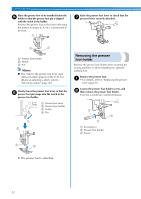
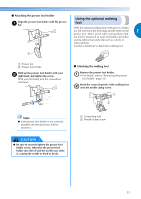
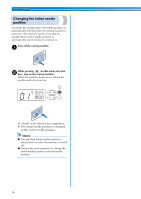
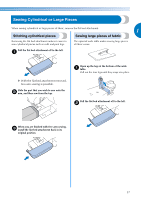
GETTING READY Place the presser foot to be installed below the e holder so that the presser foot pin is aligned with the notch in the holder. Position the presser foot so the letter indicating the presser foot type (J, A, etc.) is positioned to be read. a Raise the presser foot lever to check that the g presser foot is securely attached. b c a Presser foot holder b Notch c Pin Memo ● The code for the presser foot to be used with each stitch appears in the LCD. For details on selecting a stitch, refer to "Selecting a stitch" (page 40). Slowly lower the presser foot lever so that the f presser foot pin snaps into the notch in the presser foot holder. a Presser foot lever b Presser foot holder c Notch d Pin a b Removing the presser foot holder Remove the presser foot holder when cleaning the sewing machine or when installing the optional walking foot. Remove the presser foot. a • For details, refer to "Replacing the presser foot" (page 31). Loosen the presser foot holder screw, and b then remove the presser foot holder. Turn the screwdriver counterclockwise. a b c a Screwdriver b Presser foot holder c Screw c d X The presser foot is attached. 32
-
 1
1 -
2
-
3
-
4
-
5
-
6
-
7
-
8
-
9
-
10
-
11
-
12
-
13
-
14
-
15
-
16
-
17
-
18
-
19
-
20
-
21
-
22
-
23
-
24
-
25
-
26
-
27
-
 28
28 -
 29
29 -
 30
30 -
 31
31 -
 32
32 -
 33
33 -
 34
34 -
 35
35 -
 36
36 -
 37
37 -
 38
38 -
39
-
40
-
41
-
42
-
43
-
44
-
45
-
46
-
47
-
48
-
49
-
50
-
51
-
52
-
53
-
54
-
55
-
56
-
57
-
58
-
59
-
60
-
61
-
62
-
63
-
64
-
65
-
66
-
67
-
68
-
69
-
70
-
71
-
72
-
73
-
74
-
75
-
76
-
77
-
78
-
79
-
80
-
81
-
82
-
83
-
84
-
85
-
86
-
87
-
88
-
89
-
90
-
91
-
92
-
93
-
94
-
95
-
96
-
97
-
98
-
99
-
100
-
101
-
102
 |
 |
