Brother International Innov-ís 40 Users Manual - English - Page 84
Using the side cutter optional
 |
View all Brother International Innov-ís 40 manuals
Add to My Manuals
Save this manual to your list of manuals |
Page 84 highlights
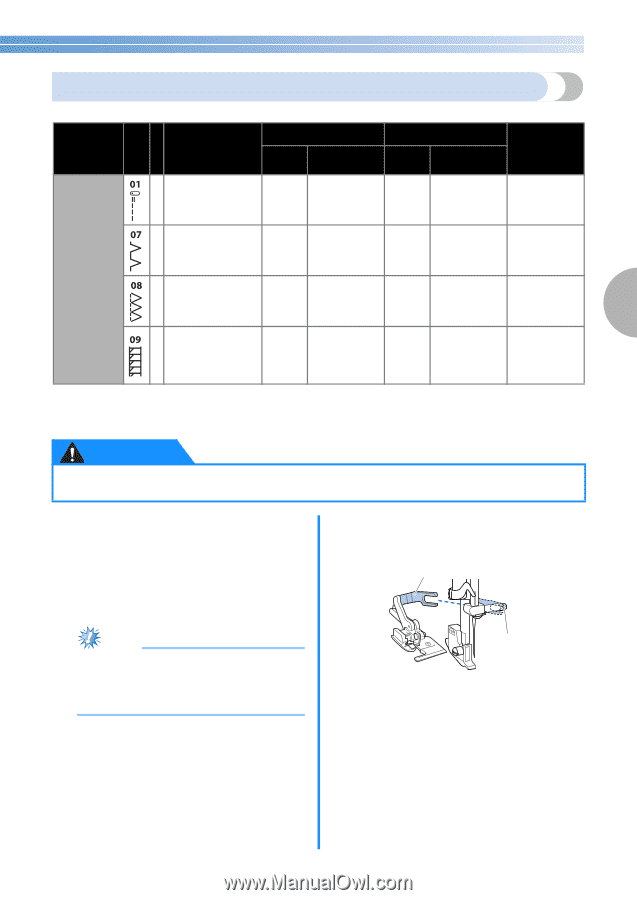
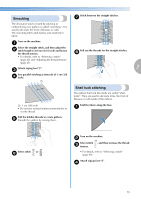
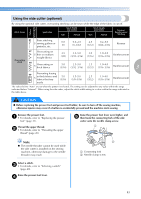
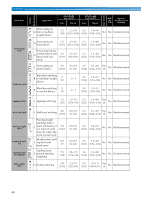
Using the side cutter (optional) By using the optional side cutter, overcasting stitching can be sewn while the edge of the fabric is cut off. Stitch Name Application Stitch Width [mm (inch)] Auto Manual Stitch Length [mm (inch)] Auto Manual Reverse/ Reinforcement Stitching Pattern Presser Foot Overcasting stitch Basic stitching, S sewing gathers or pintucks, etc. 0.0 (0) 0.0-2.5 (0-3/32) 2.5 0.2-5.0 (3/32) (1/64-3/16) Reverse Overcasting on S thin or medium weight fabrics 3.5 (1/8) 2.5-5.0 (3/32-3/16) 2.0 (1/16) 1.0-4.0 (1/16-3/16) Reinforcement S Overcasting on thick fabrics 5.0 (3/16) 2.5-5.0 (3/32-3/16) 2.5 (3/32) 1.0-4.0 (1/16-3/16) Reinforcement 3 Preventing fraying S in thick fabrics and fabrics that fray easily 5.0 (3/16) 3.5-5.0 (1/8-3/16) 2.5 (3/32) 1.0-4.0 (1/16-3/16) Reinforcement The values below "Auto" are set when the pattern is selected. The setting can be adjusted to any value within the range indicated below "Manual". When using the side cutter, adjust the stitch width setting to a value within the range indicated in the table above. CAUTION ● Before replacing the presser foot and presser foot holder, be sure to turn off the sewing machine, otherwise injuries may occur if a button is accidentally pressed and the machine starts sewing. Remove the presser foot. a • For details, refer to "Replacing the presser foot" (page 31). Thread the upper thread. b • For details, refer to "Threading the upper thread" (page 20). Raise the presser foot lever even higher, and e then hook the connecting fork of the side cutter onto the needle clamp screw. a Note ● The needle threader cannot be used while the side cutter is installed on the sewing machine, otherwise damage to the needle threader may result. b a Connecting fork b Needle clamp screw Select a stitch. c • For details, refer to "Selecting a stitch" (page 40). Raise the presser foot lever. d 83
-
 1
1 -
2
-
3
-
4
-
5
-
6
-
7
-
8
-
9
-
10
-
11
-
12
-
13
-
14
-
15
-
16
-
17
-
18
-
19
-
20
-
21
-
22
-
23
-
24
-
25
-
26
-
27
-
28
-
29
-
30
-
31
-
32
-
33
-
34
-
35
-
36
-
37
-
38
-
39
-
40
-
41
-
42
-
43
-
44
-
45
-
46
-
47
-
48
-
49
-
50
-
51
-
52
-
53
-
54
-
55
-
56
-
57
-
58
-
59
-
60
-
61
-
62
-
63
-
64
-
65
-
66
-
67
-
68
-
69
-
70
-
71
-
72
-
73
-
74
-
75
-
76
-
77
-
78
-
 79
79 -
 80
80 -
 81
81 -
 82
82 -
 83
83 -
 84
84 -
 85
85 -
 86
86 -
 87
87 -
 88
88 -
 89
89 -
90
-
91
-
92
-
93
-
94
-
95
-
96
-
97
-
98
-
99
-
100
-
101
-
102
 |
 |