Brother International Innov-ís 40 Users Manual - English - Page 72
Piecing, Quilting
 |
View all Brother International Innov-ís 40 manuals
Add to My Manuals
Save this manual to your list of manuals |
Page 72 highlights
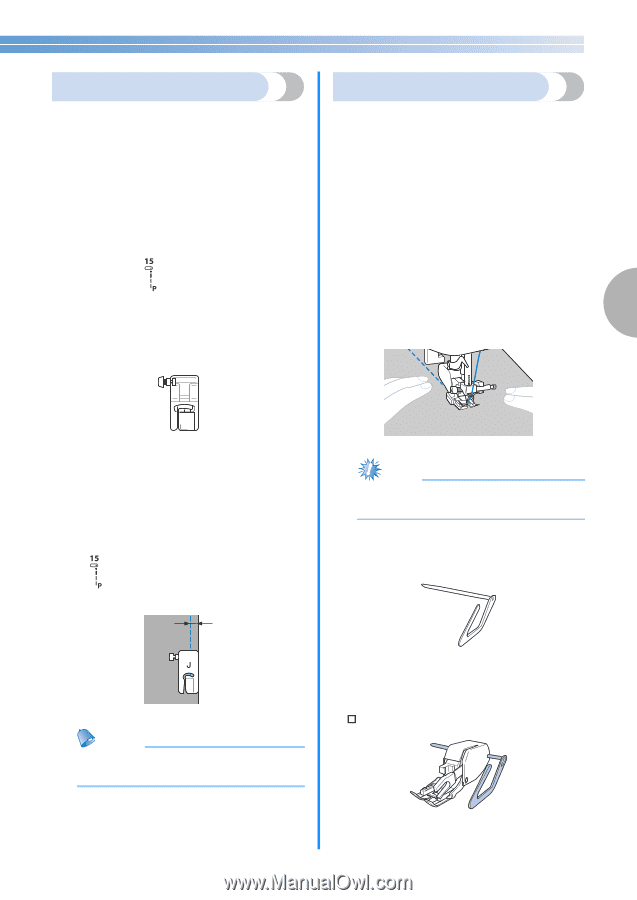
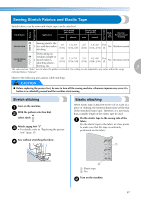
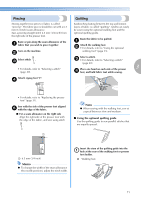
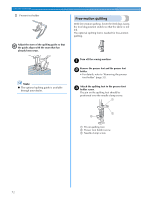
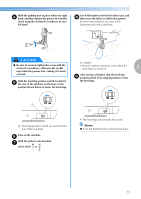
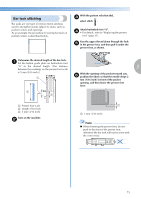
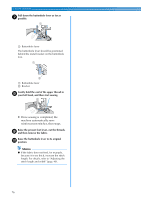
Piecing Quilting Sewing together two pieces of fabric is called "piecing". The fabric pieces should be cut with a 6.5 mm (1/4 inch) seam allowance. Sew a piecing straight stitch 6.5 mm (1/4 inch) from the right side of the presser foot. Baste or pin along the seam allowance of the a fabric that you wish to piece together. Turn on the machine. b Sandwiching batting between the top and bottom layers of fabric is called "quilting". Quilts can easily be sewn using the optional walking foot and the optional quilting guide. Baste the fabric to be quilted. a Attach the walking foot. b • For details, refer to "Using the optional walking foot" (page 33). Select stitch . c • For details, refer to "Selecting a stitch" (page 40). Select a stitch. c • For details, refer to "Selecting a stitch" (page 40). 3 Place one hand on each side of the presser d foot, and hold fabric taut while sewing. Attach zigzag foot "J". d J • For details, refer to "Replacing the presser foot" (page 31). Sew with the side of the presser foot aligned e with the edge of the fabric. ■ For a seam allowance on the right side Align the right side of the presser foot with the edge of the fabric, and sew using stitch . 1 Note ● When sewing with the walking foot, sew at a speed between slow and medium. ■ Using the optional quilting guide Use the quilting guide to sew parallel stitches that are equally spaced. a 6.5 mm (1/4 inch) Memo ● To change the width of the seam allowance (the needle position), adjust the stitch width. Insert the stem of the quilting guide into the a hole at the rear of the walking foot or presser foot holder. † Walking foot 71
-
 1
1 -
2
-
3
-
4
-
5
-
6
-
7
-
8
-
9
-
10
-
11
-
12
-
13
-
14
-
15
-
16
-
17
-
18
-
19
-
20
-
21
-
22
-
23
-
24
-
25
-
26
-
27
-
28
-
29
-
30
-
31
-
32
-
33
-
34
-
35
-
36
-
37
-
38
-
39
-
40
-
41
-
42
-
43
-
44
-
45
-
46
-
47
-
48
-
49
-
50
-
51
-
52
-
53
-
54
-
55
-
56
-
57
-
58
-
59
-
60
-
61
-
62
-
63
-
64
-
65
-
66
-
 67
67 -
 68
68 -
 69
69 -
 70
70 -
 71
71 -
 72
72 -
 73
73 -
 74
74 -
 75
75 -
 76
76 -
 77
77 -
78
-
79
-
80
-
81
-
82
-
83
-
84
-
85
-
86
-
87
-
88
-
89
-
90
-
91
-
92
-
93
-
94
-
95
-
96
-
97
-
98
-
99
-
100
-
101
-
102
 |
 |