Brother International Innov-ís 40 Users Manual - English - Page 55
Blind Hem Stitching
 |
View all Brother International Innov-ís 40 manuals
Add to My Manuals
Save this manual to your list of manuals |
Page 55 highlights
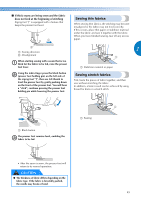
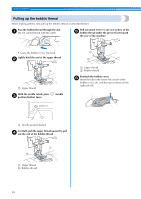
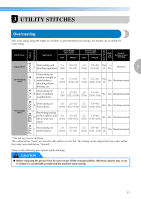
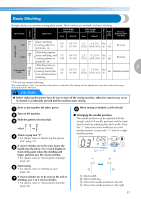
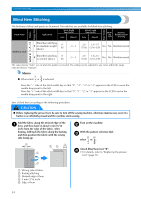
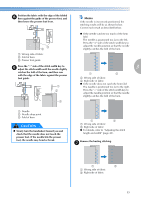
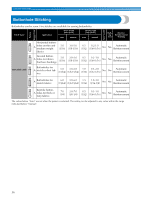
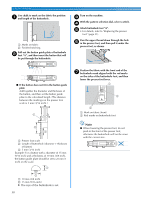
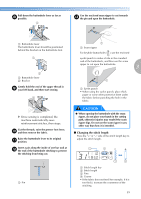
UTILITY STITCHES Blind Hem Stitching Pattern Presser Foot Twin Needle The bottoms of skirts and pants are hemmed. Two stitches are available for blind hem stitching. Stitch Name Application Stitch Width [mm (inch)] Auto Manual Stitch Length [mm (inch)] Auto Manual Walking Foot Reverse/ Reinforcement Stitching Blind hem stitch Blind hem stitching R on medium weight fabrics 0 (0) R Blind hem stitching on stretch fabrics 0 (0) -3 - 3 2.0 (1/16) 1.0-3.5 (1/16-1/8) No No Reinforcement -3 - 3 2.0 (1/16) 1.0-3.5 (1/16-1/8) No No Reinforcement The values below "Auto" are set when the pattern is selected. The setting can be adjusted to any value within the range indicated below "Manual". Memo ● When stitch or is selected Press the "-" side of the stitch width key so that "0", "-1", "-2" or "-3" appears in the LCD to move the needle drop point to the left. Press the "+" side of the stitch width key so that "0", "1", "2" or "3" appears in the LCD to move the needle drop point to the right. Sew a blind hem according to the following procedure. CAUTION ● Before replacing the presser foot, be sure to turn off the sewing machine, otherwise injuries may occur if a button is accidentally pressed and the machine starts sewing. Fold the fabric along the desired edge of the a hem, and then baste it about 5 mm (3/16 inch) from the edge of the fabric. After basting, fold back the fabric along the basting, and then position the fabric with the wrong side facing up. d eb d b a a c Turn on the machine. b With the pattern selection dial, c select or . Attach blind hem foot "R". d • For details, refer to "Replacing the presser foot" (page 31). a Wrong side of fabric b Basting stitching c Desired edge of hem d 5 mm (3/16 inch) e Edge of hem 54
-
 1
1 -
2
-
3
-
4
-
5
-
6
-
7
-
8
-
9
-
10
-
11
-
12
-
13
-
14
-
15
-
16
-
17
-
18
-
19
-
20
-
21
-
22
-
23
-
24
-
25
-
26
-
27
-
28
-
29
-
30
-
31
-
32
-
33
-
34
-
35
-
36
-
37
-
38
-
39
-
40
-
41
-
42
-
43
-
44
-
45
-
46
-
47
-
48
-
49
-
 50
50 -
 51
51 -
 52
52 -
 53
53 -
 54
54 -
 55
55 -
 56
56 -
 57
57 -
 58
58 -
 59
59 -
 60
60 -
61
-
62
-
63
-
64
-
65
-
66
-
67
-
68
-
69
-
70
-
71
-
72
-
73
-
74
-
75
-
76
-
77
-
78
-
79
-
80
-
81
-
82
-
83
-
84
-
85
-
86
-
87
-
88
-
89
-
90
-
91
-
92
-
93
-
94
-
95
-
96
-
97
-
98
-
99
-
100
-
101
-
102
 |
 |