Brother International Innov-ís 40 Users Manual - English - Page 75
Reinforcement Stitching
 |
View all Brother International Innov-ís 40 manuals
Add to My Manuals
Save this manual to your list of manuals |
Page 75 highlights
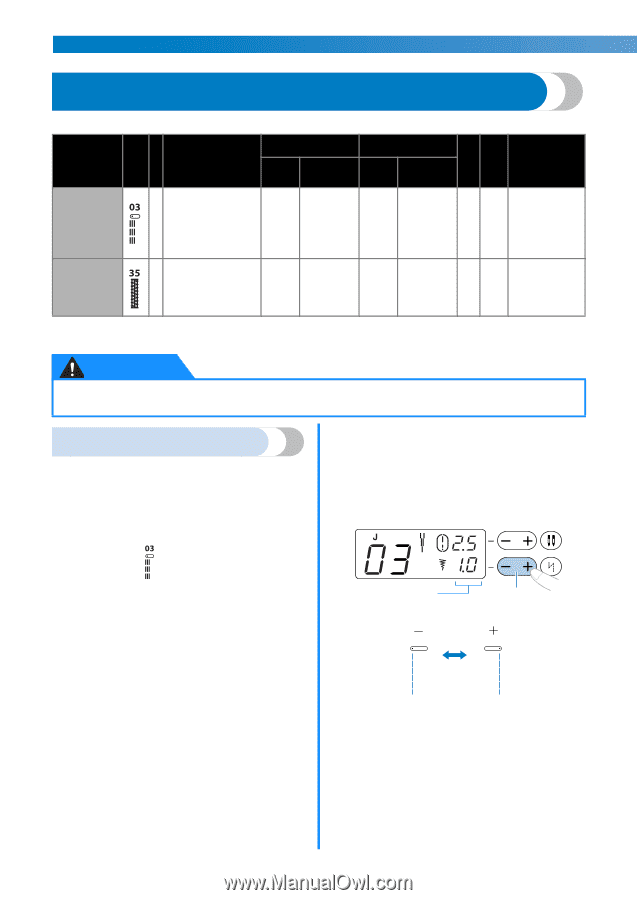
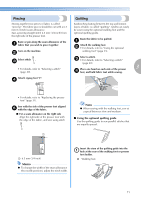
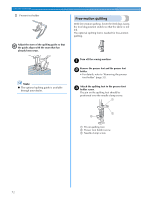
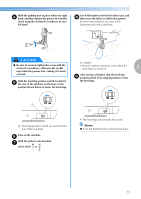
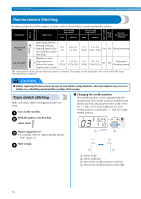
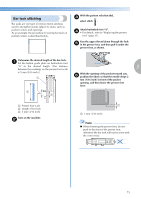
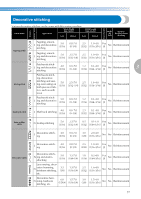
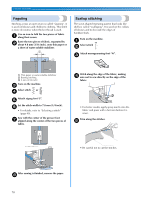
UTILITY STITCHES Reinforcement Stitching Pattern Presser Foot Twin Needle Reinforce points that will be subject to strain, such as sleeve holes, inseams and pocket corners. Stitch Name Application Stitch Width [mm (inch)] Auto Manual Stitch Length [mm (inch)] Auto Manual Walking Foot Reverse/ Reinforcement Stitching Triple stretch stitch Bar tack stitch Attaching sleeves, sewing inseams, J sewing stretch fabrics and decorative stitching Reinforce open- A ings and areas where the seam easily comes loose 0.0 (0) 2.0 (1/16) 0.0-7.0 (0-1/4) 1.0-3.0 (1/16-1/8) 2.5 (3/32) 1.5-4.0 (1/16-3/16) Yes No Reinforcement 0.4 (1/64) 0.3-1.0 (1/64-1/16) No No Automatic Reinforcement The values below "Auto" are set when the pattern is selected. The setting can be adjusted to any value within the range indicated below "Manual". CAUTION ● Before replacing the presser foot, be sure to turn off the sewing machine, otherwise injuries may occur if a button is accidentally pressed and the machine starts sewing. Triple stretch stitching With each stitch, three overlapping stitches are sewn. Turn on the machine. a With the pattern selection dial, b select stitch . ■ Changing the needle position The needle position can be adjusted with the straight stitch (left needle position) and the triple stretch stitch by adjusting the stitch width. Press the "-" side of the stitch width key for a left needle position, or press the "+" side for a right needle position. Attach zigzag foot "J". c • For details, refer to "Replacing the presser foot" (page 31). Start sewing. d a b c d a Stitch width b Stitch width key c Moves the needle position to the left d Moves the needle position to the right 74
-
 1
1 -
2
-
3
-
4
-
5
-
6
-
7
-
8
-
9
-
10
-
11
-
12
-
13
-
14
-
15
-
16
-
17
-
18
-
19
-
20
-
21
-
22
-
23
-
24
-
25
-
26
-
27
-
28
-
29
-
30
-
31
-
32
-
33
-
34
-
35
-
36
-
37
-
38
-
39
-
40
-
41
-
42
-
43
-
44
-
45
-
46
-
47
-
48
-
49
-
50
-
51
-
52
-
53
-
54
-
55
-
56
-
57
-
58
-
59
-
60
-
61
-
62
-
63
-
64
-
65
-
66
-
67
-
68
-
69
-
 70
70 -
 71
71 -
 72
72 -
 73
73 -
 74
74 -
 75
75 -
 76
76 -
 77
77 -
 78
78 -
 79
79 -
 80
80 -
81
-
82
-
83
-
84
-
85
-
86
-
87
-
88
-
89
-
90
-
91
-
92
-
93
-
94
-
95
-
96
-
97
-
98
-
99
-
100
-
101
-
102
 |
 |