Brother International MFC-9340CDW Quick Setup Guide - English - Page 12
Windows - printer driver
 |
View all Brother International MFC-9340CDW manuals
Add to My Manuals
Save this manual to your list of manuals |
Page 12 highlights
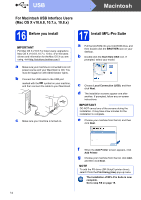
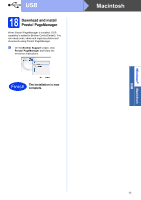
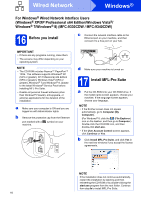
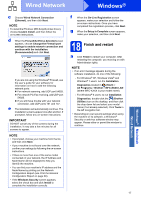
USB Windows® For Windows® USB Interface Users (Windows® XP/XP Professional x64 Edition/Windows Vista®/ Windows® 7/Windows® 8) 16 Before you install IMPORTANT • If there are any programs running, close them. • The screens may differ depending on your operating system. NOTE The CD-ROM includes Nuance™ PaperPort™ 12SE. This software supports Windows® XP (SP3 or greater), XP Professional x64 Edition (SP2 or greater), Windows Vista® (SP2 or greater), Windows® 7 and Windows® 8. Update to the latest Windows® Service Pack before installing MFL-Pro Suite. a Make sure your computer is ON and you are logged on with Administrator rights. b Press and hold down to turn off the machine, and make sure the USB interface cable is NOT connected. If you have already connected the cable, disconnect it. 17 Install MFL-Pro Suite a Put the CD-ROM into your CD-ROM drive. If the model name screen appears, choose your machine. If the language screen appears, choose your language. NOTE • If the Brother screen does not appear automatically, go to Computer (My Computer). (For Windows® 8: click the (File Explorer) icon on the taskbar, and then go to Computer.) Double-click the CD-ROM icon, and then double-click start.exe. • If the User Account Control screen appears, click Continue or Yes. b Click Install MFL-Pro Suite, and click Yes in the next two windows if you accept the license agreements. NOTE If the installation does not continue automatically, restart the installation by ejecting and then reinserting the CD-ROM or by double-clicking the start.exe program from the root folder. Continue from step b to install MFL-Pro Suite. c Choose Local Connection (USB), and then click Next. NOTE To install the PS driver (BR-Script3 printer driver), choose Custom Install, and then follow the on-screen instructions. 12
-
 1
1 -
2
-
3
-
4
-
5
-
6
-
 7
7 -
 8
8 -
 9
9 -
 10
10 -
 11
11 -
 12
12 -
 13
13 -
 14
14 -
 15
15 -
 16
16 -
 17
17 -
18
-
19
-
20
-
21
-
22
-
23
-
24
-
25
-
26
-
27
-
28
-
29
-
30
-
31
-
32
-
33
-
34
-
35
-
36
-
37
-
38
-
39
-
40
-
41
-
42
 |
 |
