Brother International MFC-9840CDW Software Users Manual - English - Page 71
Scan to OCR
 |
UPC - 012502618744
View all Brother International MFC-9840CDW manuals
Add to My Manuals
Save this manual to your list of manuals |
Page 71 highlights
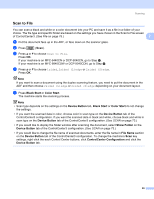
Scanning Scan to OCR 2 If your document is text, you can have it converted by ScanSoft™ PaperPort™ 11SE OCR to an editable text file and then have the result displayed in your word processing application for viewing and editing. You can change the (Scan) configuration. (See OCR (Word Processing program) on page 77.) 2 a Put the document face up in the ADF, or face down on the scanner glass. b Press (Scan). c Press a or b to choose Scan to OCR. Press OK. If your machine is an MFC-9440CN or DCP-9040CN, go to Step e. If your machine is an MFC-9840CDW or DCP-9045CDN, go to Step d. d Press a or b to choose 1sided, 2sided (L)edge or 2sided (S)edge. Press OK. Note If you want to scan a document using the duplex scanning feature, put the document in the ADF and then choose 2sided (L)edge or 2sided (S)edge depending on your document layout. e Press Black Start or Color Start. The machine starts the scanning process. Note • Scan type depends on the settings on the Device Button tab, Black Start or Color Start do not change the settings. • If you want the scanned data in color, choose color in scan type on the Device Button tab of the ControlCenter3 configuration. If you want the scanned data in black and white, choose black and white in scan type on the Device Button tab of the ControlCenter3 configuration. (See SCAN on page 73.) 64
-
 1
1 -
2
-
3
-
4
-
5
-
6
-
7
-
8
-
9
-
10
-
11
-
12
-
13
-
14
-
15
-
16
-
17
-
18
-
19
-
20
-
21
-
22
-
23
-
24
-
25
-
26
-
27
-
28
-
29
-
30
-
31
-
32
-
33
-
34
-
35
-
36
-
37
-
38
-
39
-
40
-
41
-
42
-
43
-
44
-
45
-
46
-
47
-
48
-
49
-
50
-
51
-
52
-
53
-
54
-
55
-
56
-
57
-
58
-
59
-
60
-
61
-
62
-
63
-
64
-
65
-
 66
66 -
 67
67 -
 68
68 -
 69
69 -
 70
70 -
 71
71 -
 72
72 -
 73
73 -
 74
74 -
 75
75 -
 76
76 -
77
-
78
-
79
-
80
-
81
-
82
-
83
-
84
-
85
-
86
-
87
-
88
-
89
-
90
-
91
-
92
-
93
-
94
-
95
-
96
-
97
-
98
-
99
-
100
-
101
-
102
-
103
-
104
-
105
-
106
-
107
-
108
-
109
-
110
-
111
-
112
-
113
-
114
-
115
-
116
-
117
-
118
-
119
-
120
-
121
-
122
-
123
-
124
-
125
-
126
-
127
-
128
-
129
-
130
-
131
-
132
-
133
-
134
-
135
-
136
-
137
-
138
-
139
-
140
-
141
-
142
-
143
-
144
-
145
-
146
-
147
-
148
-
149
-
150
-
151
-
152
-
153
-
154
-
155
-
156
-
157
-
158
-
159
-
160
-
161
-
162
-
163
-
164
-
165
-
166
-
167
-
168
-
169
-
170
-
171
-
172
-
173
-
174
-
175
-
176
-
177
-
178
-
179
-
180
-
181
-
182
-
183
-
184
-
185
-
186
-
187
-
188
-
189
-
190
-
191
-
192
-
193
-
194
-
195
-
196
-
197
-
198
-
199
-
200
-
201
-
202
-
203
-
204
-
205
-
206
-
207
-
208
-
209
-
210
-
211
-
212
-
213
-
214
-
215
-
216
-
217
 |
 |