Brother International PE-DESIGN 11 Startup : Reference Guide - Page 16
Installation Procedure
 |
View all Brother International PE-DESIGN 11 manuals
Add to My Manuals
Save this manual to your list of manuals |
Page 16 highlights
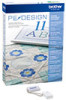
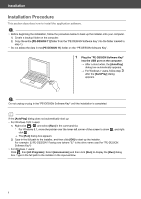
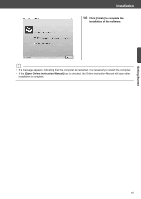
Installation Installation Procedure This section describes how to install the application software. a • Before beginning the installation, follow the procedure below to back up the installer onto your computer. 1) Create a backup folder on the computer. 2) Copy the entire [PE-DESIGN 11] folder from the "PE-DESIGN Software Key" into the folder created in step 1). • Do not delete the data in the [PE-DESIGN 11] folder on the "PE-DESIGN Software Key". 1 Plug the "PE-DESIGN Software Key" into the USB port on the computer. After a short while, the [AutoPlay] dialog box automatically appears. For Windows 7 users, follow step 3 after the [AutoPlay] dialog appears. a Do not unplug or plug in the "PE-DESIGN Software Key" until the installation is completed. b If the [AutoPlay] dialog does not automatically start up: • For Windows 10/8.1 users: 1) Right-click / and select [Run] in the command list. * For Windows 8.1, move the pointer over the lower-left corner of the screen to show , and rightclick . The [Run] dialog box appears. 2) Type in the full path to the installer, and then click [OK] to start up the installer. For example: E:\PE-DESIGN 11\setup.exe (where "E:" is the drive name used for "PE-DESIGN Software Key") • For Windows 7 users: Click , then [All Programs]. Select [Accessories] and then click [Run] to display the [Run] dialog box. Type in the full path to the installer in the input window. 7
-
 1
1 -
2
-
3
-
4
-
5
-
6
-
7
-
8
-
9
-
10
-
 11
11 -
 12
12 -
 13
13 -
 14
14 -
 15
15 -
 16
16 -
 17
17 -
 18
18 -
 19
19 -
 20
20 -
 21
21 -
22
-
23
-
24
-
25
-
26
-
27
-
28
-
29
-
30
-
31
-
32
-
33
-
34
-
35
-
36
-
37
-
38
-
39
-
40
-
41
-
42
-
43
-
44
-
45
-
46
-
47
-
48
-
49
-
50
-
51
-
52
-
53
-
54
-
55
-
56
-
57
-
58
-
59
-
60
-
61
-
62
-
63
-
64
-
65
-
66
-
67
-
68
-
69
-
70
-
71
-
72
-
73
-
74
-
75
-
76
-
77
-
78
-
79
-
80
-
81
-
82
-
83
-
84
 |
 |