Brother International PE-DESIGN 11 Startup : Reference Guide - Page 67
Symbol - Specifying the sewing direction, for each separate shape
 |
View all Brother International PE-DESIGN 11 manuals
Add to My Manuals
Save this manual to your list of manuals |
Page 67 highlights
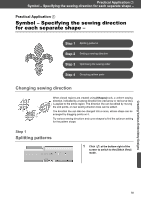
Practical Application g Symbol - Specifying the sewing direction for each separate shape - Practical Application g Symbol - Specifying the sewing direction for each separate shape - Step 1 Splitting patterns Step 2 Setting a sewing direction Step 3 Optimizing the sewing order Step 4 Grouping pattern parts Changing sewing direction When closed regions are created using [Shapes] tools, a uniform sewing direction, indicated by a sewing direction line (red arrow or red curve line), is applied to the entire region. The direction line can be edited by moving the end points, or new sewing direction lines can be added. The direction line can also be changed into a curve, whose shape can be arranged by dragging points on it. Try various sewing directions and curve shapes to find the optimum setting for the pattern shape. Step 1 Splitting patterns 1 Click at the bottom-right of the screen to switch to the [Stitch View] mode. Creating Various Embroidery Designs 58
-
 1
1 -
2
-
3
-
4
-
5
-
6
-
7
-
8
-
9
-
10
-
11
-
12
-
13
-
14
-
15
-
16
-
17
-
18
-
19
-
20
-
21
-
22
-
23
-
24
-
25
-
26
-
27
-
28
-
29
-
30
-
31
-
32
-
33
-
34
-
35
-
36
-
37
-
38
-
39
-
40
-
41
-
42
-
43
-
44
-
45
-
46
-
47
-
48
-
49
-
50
-
51
-
52
-
53
-
54
-
55
-
56
-
57
-
58
-
59
-
60
-
61
-
 62
62 -
 63
63 -
 64
64 -
 65
65 -
 66
66 -
 67
67 -
 68
68 -
 69
69 -
 70
70 -
 71
71 -
 72
72 -
73
-
74
-
75
-
76
-
77
-
78
-
79
-
80
-
81
-
82
-
83
-
84
 |
 |
