Brother International PE-DESIGN 11 Startup : Reference Guide - Page 51
Practical Application, Photo embroidery - Creating an embroidery pattern from a photo
 |
View all Brother International PE-DESIGN 11 manuals
Add to My Manuals
Save this manual to your list of manuals |
Page 51 highlights
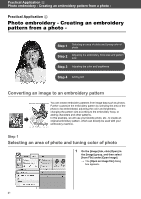
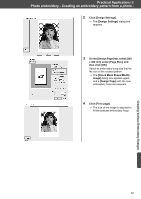
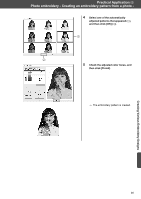
Practical Application d Photo embroidery - Creating an embroidery pattern from a photo - 2 Select [shh_gesture.jpg] that is located at Documents (My documents)\PE-DESIGN 11\Sample\ Layout & Editing\Photo Stitch, and then click [Open]. The selected photo appears in the [Design Page]. 3 Click [Photo Stitch 1] in the [Stitch Wizard] group, and then click [Color]. The [Select Mask] dialog box appears. 4 Click [Image Tune]. 5 Adjust the sharpness, brightness, contrast and color saturation. For this example, increase the saturation by dragging the saturation slider to the third setting from the right, and then click [OK]. 42 Creating Various Embroidery Designs
-
 1
1 -
2
-
3
-
4
-
5
-
6
-
7
-
8
-
9
-
10
-
11
-
12
-
13
-
14
-
15
-
16
-
17
-
18
-
19
-
20
-
21
-
22
-
23
-
24
-
25
-
26
-
27
-
28
-
29
-
30
-
31
-
32
-
33
-
34
-
35
-
36
-
37
-
38
-
39
-
40
-
41
-
42
-
43
-
44
-
45
-
 46
46 -
 47
47 -
 48
48 -
 49
49 -
 50
50 -
 51
51 -
 52
52 -
 53
53 -
 54
54 -
 55
55 -
 56
56 -
57
-
58
-
59
-
60
-
61
-
62
-
63
-
64
-
65
-
66
-
67
-
68
-
69
-
70
-
71
-
72
-
73
-
74
-
75
-
76
-
77
-
78
-
79
-
80
-
81
-
82
-
83
-
84
 |
 |

42
Practical Application
d
Photo embroidery - Creating an embroidery pattern from a photo -
Creating Various Embroidery Designs
2
Select [shh_gesture.jpg] that is
located at Documents (My
documents)\PE-DESIGN 11\Sample\
Layout & Editing\Photo Stitch, and
then click [Open].
The selected photo appears in the
[Design Page]
.
3
Click [Photo Stitch 1] in the [Stitch
Wizard] group, and then click
[Color].
The
[Select Mask]
dialog box
appears.
4
Click [Image Tune].
5
Adjust the sharpness, brightness,
contrast and color saturation.
For this example, increase the
saturation by dragging the saturation
slider to the third setting from the right,
and then click
[OK]
.