Brother International PE-DESIGN 11 Startup : Reference Guide - Page 50
Photo embroidery - Creating an embroidery, pattern from a photo
 |
View all Brother International PE-DESIGN 11 manuals
Add to My Manuals
Save this manual to your list of manuals |
Page 50 highlights
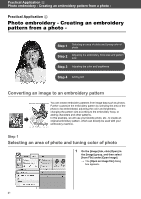
Practical Application d Photo embroidery - Creating an embroidery pattern from a photo - Practical Application d Photo embroidery - Creating an embroidery pattern from a photo - Step 1 Selecting an area of photo and tuning color of photo Step 2 Adjusting the embroidery hoop size and pattern size Step 3 Adjusting the color and brightness Step 4 Adding text Converting an image to an embroidery pattern You can create embroidery patterns from image data such as photos. Further customize the embroidery pattern by selecting the area of the photo to be embroidered, adjusting the color and brightness, changing the pattern size according to the embroidery hoop, or adding characters and other patterns. In this example, we will use your favorite photo, etc., to create an original embroidery pattern, which can directly be used with your embroidery machine. Step 1 Selecting an area of photo and tuning color of photo 1 On the [Image] tab, click [Open] in the [Image] group, and then select [from File] under [Open Image]. The [Open an image file] dialog box appears. 41
-
 1
1 -
2
-
3
-
4
-
5
-
6
-
7
-
8
-
9
-
10
-
11
-
12
-
13
-
14
-
15
-
16
-
17
-
18
-
19
-
20
-
21
-
22
-
23
-
24
-
25
-
26
-
27
-
28
-
29
-
30
-
31
-
32
-
33
-
34
-
35
-
36
-
37
-
38
-
39
-
40
-
41
-
42
-
43
-
44
-
 45
45 -
 46
46 -
 47
47 -
 48
48 -
 49
49 -
 50
50 -
 51
51 -
 52
52 -
 53
53 -
 54
54 -
 55
55 -
56
-
57
-
58
-
59
-
60
-
61
-
62
-
63
-
64
-
65
-
66
-
67
-
68
-
69
-
70
-
71
-
72
-
73
-
74
-
75
-
76
-
77
-
78
-
79
-
80
-
81
-
82
-
83
-
84
 |
 |
