Brother International PE-DESIGN 11 Startup : Reference Guide - Page 56
Adding text
 |
View all Brother International PE-DESIGN 11 manuals
Add to My Manuals
Save this manual to your list of manuals |
Page 56 highlights
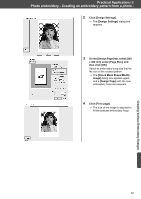
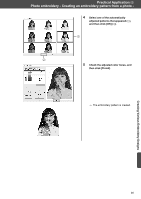
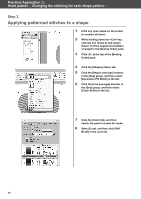
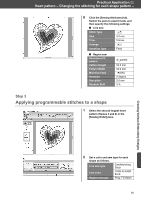
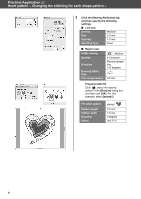
Practical Application d Photo embroidery - Creating an embroidery pattern from a photo - Step 4 Adding text 1 On the [Home] tab, click [Text] in the [Tools] group, and then select [Text] under [Text Tools]. 2 On the [Text] tab, select [002 Script 01] from the [Font] selector, and select [20.0] from the [Text Size] selector. 3 Click below the image in the [Design Page], type "2000.01.01", and then press the key. 4 Specify the following settings for the text. Region sew type Fill Stitch Region color DEEP GOLD 47
-
 1
1 -
2
-
3
-
4
-
5
-
6
-
7
-
8
-
9
-
10
-
11
-
12
-
13
-
14
-
15
-
16
-
17
-
18
-
19
-
20
-
21
-
22
-
23
-
24
-
25
-
26
-
27
-
28
-
29
-
30
-
31
-
32
-
33
-
34
-
35
-
36
-
37
-
38
-
39
-
40
-
41
-
42
-
43
-
44
-
45
-
46
-
47
-
48
-
49
-
50
-
 51
51 -
 52
52 -
 53
53 -
 54
54 -
 55
55 -
 56
56 -
 57
57 -
 58
58 -
 59
59 -
 60
60 -
 61
61 -
62
-
63
-
64
-
65
-
66
-
67
-
68
-
69
-
70
-
71
-
72
-
73
-
74
-
75
-
76
-
77
-
78
-
79
-
80
-
81
-
82
-
83
-
84
 |
 |

47
Practical Application
d
Photo embroidery - Creating an embroidery pattern from a photo -
Step 4
Adding text
1
On the [Home] tab, click [Text] in the
[Tools] group, and then select [Text]
under [Text Tools].
2
On the [Text] tab, select [002 Script
01] from the [Font] selector, and
select [20.0] from the [Text Size]
selector.
3
Click below the image in the [Design
Page], type "2000.01.01", and then
press the <Enter> key.
4
Specify the following settings for the
text.
Region sew type
Fill Stitch
Region color
DEEP GOLD