Brother International PS-2200 Users Manual - English - Page 57
Making a Buttonhole
 |
View all Brother International PS-2200 manuals
Add to My Manuals
Save this manual to your list of manuals |
Page 57 highlights
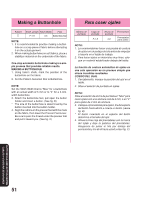
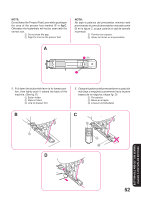
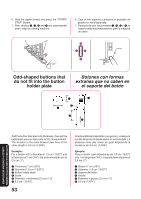
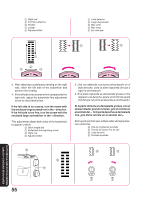
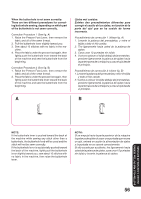
Making a Buttonhole Pattern Stitch Length Stitch Width Foot F-1.5 4-6 Buttonhole foot NOTE: 1. It is recommended to practice making a button- hole on a scrap piece of fabric before attempting it on the actual garment. 2. When making buttonholes on soft fabrics, place a stabilizer material on the underside of the fabric. One-step automatic buttonhole-making is a simple process that provides reliable results. MAKING A BUTTONHOLE 1. Using tailor's chalk, mark the position of the buttonhole on the fabric. 2. Set the Pattern Selection Dial to Buttonhole. NOTE: Set the Stitch Width Dial to "Max" for a buttonhole with an actual width of 5 mm or to "4" for a 3-mmwidth buttonhole. 3. Attach the buttonhole foot, pull open the button holder and insert a button. (See fig. B) * The size of the buttonhole is determined by the button inserted into the button holder. 4. Align the red line on the presser foot with the mark on the fabric, then lower the Presser Foot Lever. Be sure to pass the thread under the presser foot and pull it toward you. (See fig. C) Para coser ojales Modelo de puntada Largo de puntada F-1,5 Ancho de puntada 4-6 Prensatelas Prensatelas para ojales NOTA: 1. Le recomendamos hacer una prueba de costura de ojales en un pedazo de tela antes de empezar a hacerla en el tejido de trabajo. 2. Para hacer ojales en materiales muy finos, coloque un material estabilizador debajo del tejido. La función de costura automática de ojales en una sola operación es un proceso simple que ofrece increíbles resultados. COSIDO DEL OJAL 1. Con jaboncillo, marque la posición del ojal en el tejido. 2. Sitúe el selector de puntada en ojales. NOTA: Sitúe el selector de ancho de puntada en "Max" para coser ojales con una anchura real de 5 mm, o en "4" para ojales de 3 mm de anchura. 3. Coloque el prensatelas para ojales, tire del soporte del botón hasta abrirlo e inserte un botón (véase fig. B). * El botón insertado en el soporte del botón determina el tamaño del ojal. 4. Alinee la línea roja del prensatelas con la marca del tejido y baje la palanca del prensatelas. Asegúrese de pasar el hilo por debajo del prensatelas y tire de él hacia usted (véase fig. C). BUTTONHOLE AND BUTTON SEWING OJALES Y COSTURA DE BOTONES 51
-
 1
1 -
2
-
3
-
4
-
5
-
6
-
7
-
8
-
9
-
10
-
11
-
12
-
13
-
14
-
15
-
16
-
17
-
18
-
19
-
20
-
21
-
22
-
23
-
24
-
25
-
26
-
27
-
28
-
29
-
30
-
31
-
32
-
33
-
34
-
35
-
36
-
37
-
38
-
39
-
40
-
41
-
42
-
43
-
44
-
45
-
46
-
47
-
48
-
49
-
50
-
51
-
 52
52 -
 53
53 -
 54
54 -
 55
55 -
 56
56 -
 57
57 -
 58
58 -
 59
59 -
 60
60 -
 61
61 -
 62
62 -
63
-
64
-
65
-
66
-
67
-
68
-
69
-
70
-
71
-
72
-
73
-
74
-
75
-
76
-
77
-
78
-
79
-
80
-
81
-
82
-
83
-
84
-
85
-
86
-
87
-
88
-
89
-
90
-
91
 |
 |
