Brother International PS-2200 Users Manual - English - Page 73
Utilizaci, n del pie-gu, a para costuras
 |
View all Brother International PS-2200 manuals
Add to My Manuals
Save this manual to your list of manuals |
Page 73 highlights
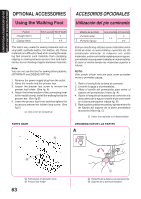
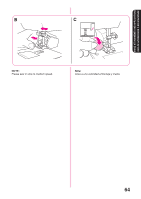
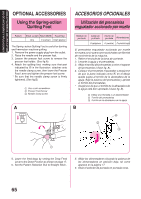
USING ATTACHMENTS AND APPLICATIONS USO DE ACCESORIOS Y APLICACIONES OPTIONAL ACCESSORIES Using the 1/4" Seam Guide Foot Pattern (Straight Stitch) Stitch Length Stitch Width 2-2.5 0 (center) The 1/4" Seam Guide Foot is used to sew fixed seam allowance 6.4 mm (1/4") when piecing together a quilt. (See fig.A) 1. Set the Pattern Selection Dial to Straight Stitch. Set the Stitch Length between 2 and 2.5. Set the Stitch Width 0. 2. Change the foot to the 1/4 Seam Guide foot. 1 Seam allowance (1/4", 6.4mm) 3. Position the presser foot over the fabric and sew as shown in fig. B and C. A ACCESORIOS OPCIONALES Utilización del pie-guía para costuras Modelo de puntada (Puntada recta) Largo de puntada Ancho de puntada 2-2.5 0(centro) El pie-guía para costuras se utiliza para coser costuras con una anchura fija de 6,4 mm (1/4") al juntar las partes de un acolchado (véase fig. A). 1. Sitúe el selector de puntadas en puntada recta. Sitúe el selector de largo de puntada entre 2 y 2,5. Sitúe el ancho de puntada en 0. 2. Coloque el pie-guía para costuras. 1 Anchura de la costura (1/4", 6,4 mm) 3. Coloque el prensatelas sobre el tejido, y cosa tal como se indica en las figuras B y C. 1 B 3 2 C 6 4 5 • Achieve leaving an accurate seam allowance. (See fig.B) 2 Beginnig of stitching. 3 Align this mark with edge of fabric. 4 End of stitching 5 Align this mark with edge of fabric. • Quickly stitch together a quilt. (See fig.C) 6 Top of fabric. 7 Sean (1/8", 3.2mm) 67 7 • Para hacer una anchura de la costura correcta. 2 Principio de la puntada 3 Alinee esta marca con el borde del tejido. 4 Final de la puntada 5 Alinee esta marca con el borde del tejido. • Cosido rápido de un acolchado. 6 Parte superior del tejido. 7 Costura (1/8", 3,2 mm)
-
 1
1 -
2
-
3
-
4
-
5
-
6
-
7
-
8
-
9
-
10
-
11
-
12
-
13
-
14
-
15
-
16
-
17
-
18
-
19
-
20
-
21
-
22
-
23
-
24
-
25
-
26
-
27
-
28
-
29
-
30
-
31
-
32
-
33
-
34
-
35
-
36
-
37
-
38
-
39
-
40
-
41
-
42
-
43
-
44
-
45
-
46
-
47
-
48
-
49
-
50
-
51
-
52
-
53
-
54
-
55
-
56
-
57
-
58
-
59
-
60
-
61
-
62
-
63
-
64
-
65
-
66
-
67
-
 68
68 -
 69
69 -
 70
70 -
 71
71 -
 72
72 -
 73
73 -
 74
74 -
 75
75 -
 76
76 -
 77
77 -
 78
78 -
79
-
80
-
81
-
82
-
83
-
84
-
85
-
86
-
87
-
88
-
89
-
90
-
91
 |
 |
