Brother International PT18R Users Manual - English and Spanish - Page 8
Creating Your First Label, Creating a label with the P-touch - tapes
 |
UPC - 012502610144
View all Brother International PT18R manuals
Add to My Manuals
Save this manual to your list of manuals |
Page 8 highlights
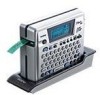
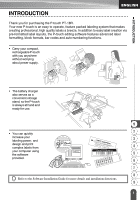
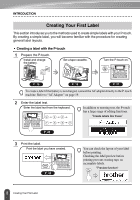
INTRODUCTION Creating Your First Label This section introduces you to the methods used to create simple labels with your P-touch. By creating a simple label, you will become familiar with the procedure for creating general label layouts. Creating a label with the P-touch 1 Prepare the P-touch. Install and charge the battery. Set a tape cassette. Turn the P-touch on. P. 16 P. 19 P. 21 To create a label if the battery is not charged, connect the AC adapter directly to the P-touch machine. Refer to "AC Adapter" on page 19. 2 Enter the label text. Enter the label text from the keyboard. In addition to entering text, the P-touch has a large range of editing functions. "Create labels like these" P. 24 3 Print the label. Print the label you have created. P. 43 You can check the layout of your label before printing. Checking the label preview before printing prevents wasting tape on incomplete labels. "Preview function" 2 Creating Your First Label
-
 1
1 -
2
-
 3
3 -
 4
4 -
 5
5 -
 6
6 -
 7
7 -
 8
8 -
 9
9 -
 10
10 -
 11
11 -
 12
12 -
 13
13 -
14
-
15
-
16
-
17
-
18
-
19
-
20
-
21
-
22
-
23
-
24
-
25
-
26
-
27
-
28
-
29
-
30
-
31
-
32
-
33
-
34
-
35
-
36
-
37
-
38
-
39
-
40
-
41
-
42
-
43
-
44
-
45
-
46
-
47
-
48
-
49
-
50
-
51
-
52
-
53
-
54
-
55
-
56
-
57
-
58
-
59
-
60
-
61
-
62
-
63
-
64
-
65
-
66
-
67
-
68
-
69
-
70
-
71
-
72
-
73
-
74
-
75
-
76
-
77
-
78
-
79
-
80
-
81
-
82
-
83
-
84
-
85
-
86
-
87
-
88
-
89
-
90
-
91
-
92
-
93
-
94
-
95
-
96
-
97
-
98
-
99
-
100
-
101
-
102
-
103
-
104
-
105
-
106
-
107
-
108
-
109
-
110
-
111
-
112
-
113
-
114
-
115
-
116
-
117
-
118
-
119
-
120
-
121
-
122
-
123
-
124
-
125
-
126
-
127
-
128
-
129
-
130
-
131
-
132
-
133
-
134
-
135
-
136
-
137
-
138
-
139
-
140
-
141
-
142
-
143
-
144
-
145
-
146
-
147
-
148
-
149
-
150
-
151
-
152
-
153
-
154
-
155
-
156
-
157
-
158
-
159
-
160
 |
 |
