Brother International Quattro 2 6700D Users Manual - English - Page 152
check that the vertical stitch alignment foot
 |
View all Brother International Quattro 2 6700D manuals
Add to My Manuals
Save this manual to your list of manuals |
Page 152 highlights
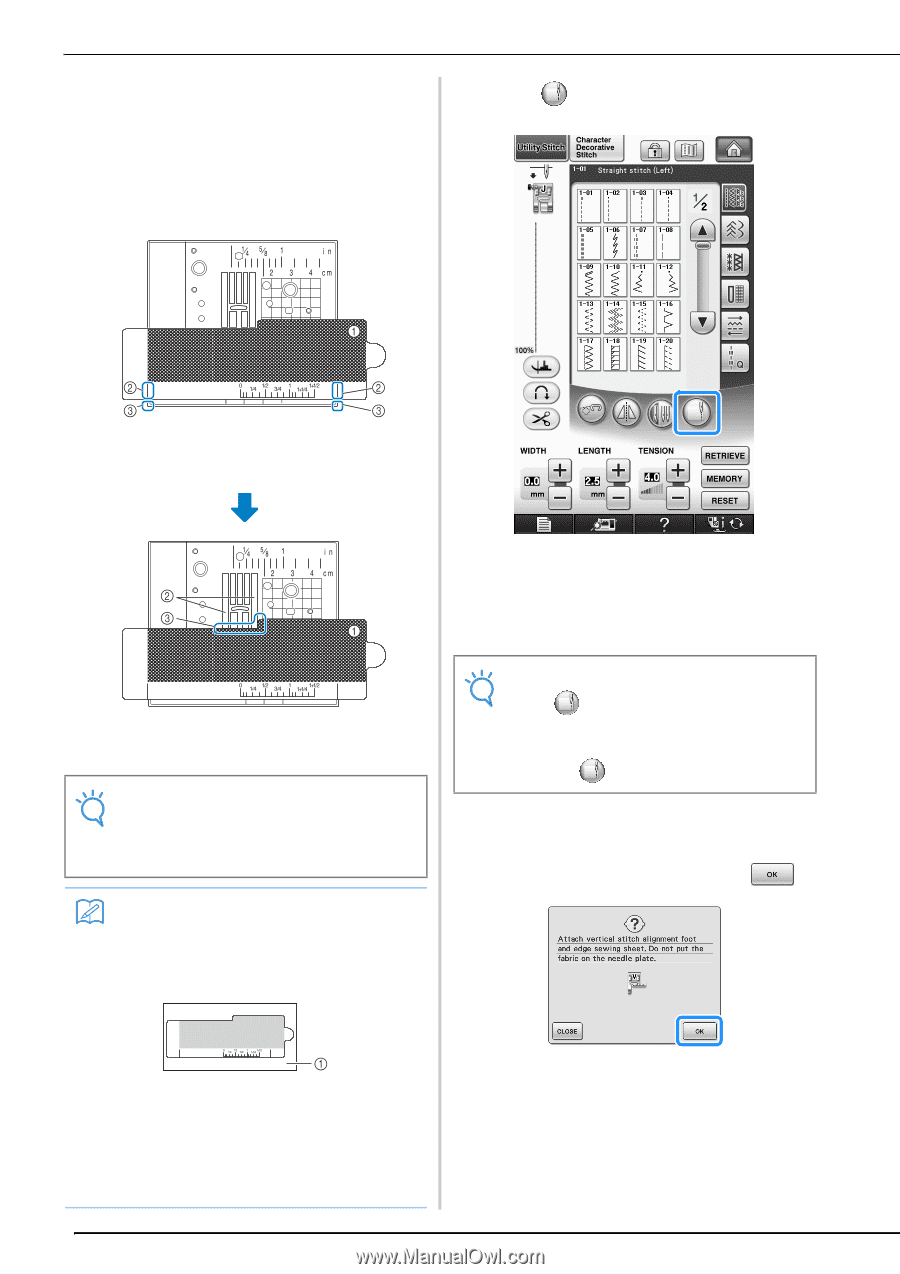
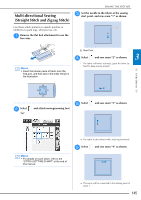
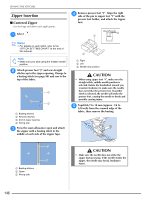
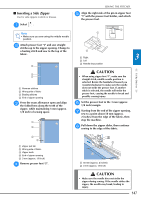
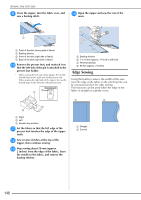
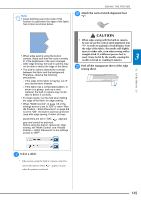
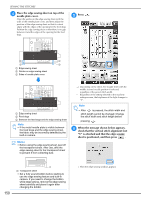
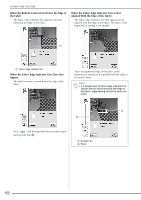
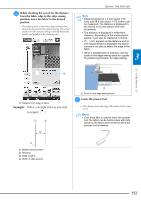
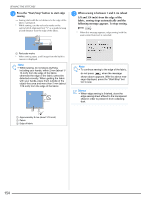
SEWING THE STITCHES d Place the edge sewing needle plate cover. sheet on top of the e Press . Align the guides on the edge sewing sheet with the sides of the needle plate cover, and then adjust the position of the edge sewing sheet so that its cutout aligns with the edges of the opening for the feed dogs. Position the edge sewing sheet so that there is no gap between it and the edges of the opening for the feed dogs. a Edge sewing sheet b Guides on edge sewing sheet c Sides of needle plate cover a Edge sewing sheet b Feed dogs c Between the feed dogs and the edge sewing sheet Note • If the metal needle plate is visible between the feed dogs and the edge sewing sheet, the fabric may be incorrectly detected by the built-in camera. Memo • Before using the edge sewing sheet, peel off the transparent sheet. After use, affix the edge sewing sheet to the transparent sheet to prevent it from collecting dust. → Depending on the stitch, the straight stitch with the middle (center) needle position is selected, regardless of the preset stitch width. * Regardless of the setting selected in the machine settings screen, the brightness of the light changes to "5". Note • After is pressed, the stitch width and stitch length cannot be changed. Change the stitch width and stitch length before pressing . f When the message shown below appears, check that the vertical stitch alignment foot "V" is attached and that the edge sewing sheet is positioned, and then press . 150 a Transparent sheet • Set a fully wound bobbin before starting to use the edge sewing feature and built-in camera. If you need to change the bobbin while edge sewing, remove the edge sewing sheet carefully and place it again after changing the bobbin. → Then the edge sewing window appears.
-
 1
1 -
2
-
3
-
4
-
5
-
6
-
7
-
8
-
9
-
10
-
11
-
12
-
13
-
14
-
15
-
16
-
17
-
18
-
19
-
20
-
21
-
22
-
23
-
24
-
25
-
26
-
27
-
28
-
29
-
30
-
31
-
32
-
33
-
34
-
35
-
36
-
37
-
38
-
39
-
40
-
41
-
42
-
43
-
44
-
45
-
46
-
47
-
48
-
49
-
50
-
51
-
52
-
53
-
54
-
55
-
56
-
57
-
58
-
59
-
60
-
61
-
62
-
63
-
64
-
65
-
66
-
67
-
68
-
69
-
70
-
71
-
72
-
73
-
74
-
75
-
76
-
77
-
78
-
79
-
80
-
81
-
82
-
83
-
84
-
85
-
86
-
87
-
88
-
89
-
90
-
91
-
92
-
93
-
94
-
95
-
96
-
97
-
98
-
99
-
100
-
101
-
102
-
103
-
104
-
105
-
106
-
107
-
108
-
109
-
110
-
111
-
112
-
113
-
114
-
115
-
116
-
117
-
118
-
119
-
120
-
121
-
122
-
123
-
124
-
125
-
126
-
127
-
128
-
129
-
130
-
131
-
132
-
133
-
134
-
135
-
136
-
137
-
138
-
139
-
140
-
141
-
142
-
143
-
144
-
145
-
146
-
 147
147 -
 148
148 -
 149
149 -
 150
150 -
 151
151 -
 152
152 -
 153
153 -
 154
154 -
 155
155 -
 156
156 -
 157
157 -
158
-
159
-
160
-
161
-
162
-
163
-
164
-
165
-
166
-
167
-
168
-
169
-
170
-
171
-
172
-
173
-
174
-
175
-
176
-
177
-
178
-
179
-
180
-
181
-
182
-
183
-
184
-
185
-
186
-
187
-
188
-
189
-
190
-
191
-
192
-
193
-
194
-
195
-
196
-
197
-
198
-
199
-
200
-
201
-
202
-
203
-
204
-
205
-
206
-
207
-
208
-
209
-
210
-
211
-
212
-
213
-
214
-
215
-
216
-
217
-
218
-
219
-
220
-
221
-
222
-
223
-
224
-
225
-
226
-
227
-
228
-
229
-
230
-
231
-
232
-
233
-
234
-
235
-
236
-
237
-
238
-
239
-
240
-
241
-
242
-
243
-
244
-
245
-
246
-
247
-
248
-
249
-
250
-
251
-
252
-
253
-
254
-
255
-
256
-
257
-
258
-
259
-
260
-
261
-
262
-
263
-
264
-
265
-
266
-
267
-
268
-
269
-
270
-
271
-
272
-
273
-
274
-
275
-
276
-
277
-
278
-
279
-
280
-
281
-
282
-
283
-
284
-
285
-
286
-
287
-
288
-
289
-
290
-
291
-
292
-
293
-
294
-
295
-
296
-
297
-
298
-
299
-
300
-
301
-
302
-
303
-
304
-
305
-
306
-
307
-
308
-
309
-
310
-
311
-
312
-
313
-
314
-
315
-
316
-
317
-
318
-
319
-
320
-
321
-
322
-
323
-
324
-
325
-
326
-
327
-
328
-
329
-
330
-
331
-
332
-
333
-
334
-
335
-
336
-
337
-
338
-
339
-
340
-
341
-
342
-
343
-
344
-
345
-
346
-
347
-
348
-
349
-
350
-
351
-
352
-
353
-
354
-
355
-
356
-
357
-
358
-
359
-
360
-
361
-
362
-
363
-
364
-
365
-
366
-
367
-
368
-
369
-
370
-
371
-
372
-
373
-
374
-
375
-
376
 |
 |