Brother International Quattro 2 6700D Users Manual - English - Page 255
Saving Embroidery Patterns in, the Computer
 |
View all Brother International Quattro 2 6700D manuals
Add to My Manuals
Save this manual to your list of manuals |
Page 255 highlights
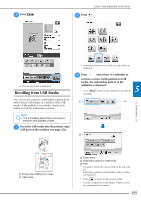
USING THE MEMORY FUNCTION b Insert the USB media into the USB port on the machine. primary (top) Saving Embroidery Patterns in the Computer Using the included USB cable, the machine can be connected to your computer, and the embroidery patterns can be temporarily retrieved from and saved in the "Removable Disk" folder in your computer. A total of about 3 MB of embroidery patterns can be saved in the "Removable disk", but the saved embroidery patterns are deleted when the machine is turned OFF. a Primary (top) USB port for media b USB media Note • The processing speed may vary by port selection and quantity of data. The primary (top) USB port processes the data faster than the center port. It is recommended to use the primary (top) USB port. • Two USB media cannot be used with this machine at the same time. If two USB media are inserted, only the USB media inserted first is detected. • Do not insert anything other than USB media into the USB media port. Otherwise, the USB media drive may be damaged. Note • Do not turn the main power to OFF while the "Saving" screen is displayed. You will lose the pattern you are saving. a Plug the USB cable connector into the corresponding USB ports for the computer and for the machine. b Turn on your computer and select "Computer (My computer)". * The USB cable can be plugged into the USB ports 5 on the computer and embroidery machine whether or not they are turned on. Embroidery c Press * Press saving. . to return to the original screen without → The "Saving" screen is displayed. When the pattern is saved, the display returns to the original screen automatically. Note • Do not insert or remove USB media while "Saving" screen is displayed. You will lose some or all of the pattern you are saving. a USB port for computer b USB cable connector → The "Removable Disk" icon will appear in "Computer (My computer)" on the computer. Note • The connectors on the USB cable can only be inserted into a port in one direction. If it is difficult to insert the connector, do not insert it with force. Check the orientation of the connector. • For details on the position of the USB port on the computer (or USB hub), refer to the instruction manual for the corresponding equipment. 253
-
 1
1 -
2
-
3
-
4
-
5
-
6
-
7
-
8
-
9
-
10
-
11
-
12
-
13
-
14
-
15
-
16
-
17
-
18
-
19
-
20
-
21
-
22
-
23
-
24
-
25
-
26
-
27
-
28
-
29
-
30
-
31
-
32
-
33
-
34
-
35
-
36
-
37
-
38
-
39
-
40
-
41
-
42
-
43
-
44
-
45
-
46
-
47
-
48
-
49
-
50
-
51
-
52
-
53
-
54
-
55
-
56
-
57
-
58
-
59
-
60
-
61
-
62
-
63
-
64
-
65
-
66
-
67
-
68
-
69
-
70
-
71
-
72
-
73
-
74
-
75
-
76
-
77
-
78
-
79
-
80
-
81
-
82
-
83
-
84
-
85
-
86
-
87
-
88
-
89
-
90
-
91
-
92
-
93
-
94
-
95
-
96
-
97
-
98
-
99
-
100
-
101
-
102
-
103
-
104
-
105
-
106
-
107
-
108
-
109
-
110
-
111
-
112
-
113
-
114
-
115
-
116
-
117
-
118
-
119
-
120
-
121
-
122
-
123
-
124
-
125
-
126
-
127
-
128
-
129
-
130
-
131
-
132
-
133
-
134
-
135
-
136
-
137
-
138
-
139
-
140
-
141
-
142
-
143
-
144
-
145
-
146
-
147
-
148
-
149
-
150
-
151
-
152
-
153
-
154
-
155
-
156
-
157
-
158
-
159
-
160
-
161
-
162
-
163
-
164
-
165
-
166
-
167
-
168
-
169
-
170
-
171
-
172
-
173
-
174
-
175
-
176
-
177
-
178
-
179
-
180
-
181
-
182
-
183
-
184
-
185
-
186
-
187
-
188
-
189
-
190
-
191
-
192
-
193
-
194
-
195
-
196
-
197
-
198
-
199
-
200
-
201
-
202
-
203
-
204
-
205
-
206
-
207
-
208
-
209
-
210
-
211
-
212
-
213
-
214
-
215
-
216
-
217
-
218
-
219
-
220
-
221
-
222
-
223
-
224
-
225
-
226
-
227
-
228
-
229
-
230
-
231
-
232
-
233
-
234
-
235
-
236
-
237
-
238
-
239
-
240
-
241
-
242
-
243
-
244
-
245
-
246
-
247
-
248
-
249
-
 250
250 -
 251
251 -
 252
252 -
 253
253 -
 254
254 -
 255
255 -
 256
256 -
 257
257 -
 258
258 -
 259
259 -
 260
260 -
261
-
262
-
263
-
264
-
265
-
266
-
267
-
268
-
269
-
270
-
271
-
272
-
273
-
274
-
275
-
276
-
277
-
278
-
279
-
280
-
281
-
282
-
283
-
284
-
285
-
286
-
287
-
288
-
289
-
290
-
291
-
292
-
293
-
294
-
295
-
296
-
297
-
298
-
299
-
300
-
301
-
302
-
303
-
304
-
305
-
306
-
307
-
308
-
309
-
310
-
311
-
312
-
313
-
314
-
315
-
316
-
317
-
318
-
319
-
320
-
321
-
322
-
323
-
324
-
325
-
326
-
327
-
328
-
329
-
330
-
331
-
332
-
333
-
334
-
335
-
336
-
337
-
338
-
339
-
340
-
341
-
342
-
343
-
344
-
345
-
346
-
347
-
348
-
349
-
350
-
351
-
352
-
353
-
354
-
355
-
356
-
357
-
358
-
359
-
360
-
361
-
362
-
363
-
364
-
365
-
366
-
367
-
368
-
369
-
370
-
371
-
372
-
373
-
374
-
375
-
376
 |
 |
