Brother International Quattro 2 6700D Users Manual - English - Page 33
Display, Key Name, Explanation
 |
View all Brother International Quattro 2 6700D manuals
Add to My Manuals
Save this manual to your list of manuals |
Page 33 highlights
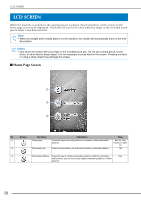
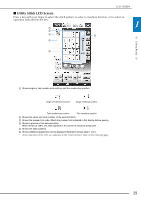
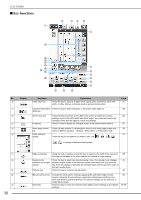
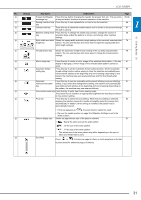
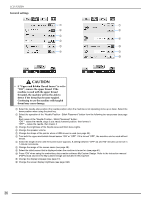
LCD SCREEN No. Display Key Name Explanation Page l Presser foot/Needle Press this key before changing the needle, the presser foot, etc. This key locks 65-68 exchange key all key and button functions to prevent operation of the machine. m Sewing machine help Press this key to see explanations on how to use the machine. key 1 44 n Camera view key Touch this key to check the needle location as it is shown on the screen through 87 the built in camera. o Machine setting mode Press this key to change the needle stop position, change the volume of 35 key operation beep, adjust the pattern or screen, and change other machine settings. p Stitch width and stitch Shows the zigzag width and stitch length settings of the currently selected stitch 78 length key pattern. You can use the plus and minus keys to adjust the zigzag width and stitch length settings. Getting Ready q Thread tension key Shows the automatic thread tension setting of the currently selected stitch 79 pattern. You can use the plus and minus keys to change the thread tension settings. r Mirror image key Press this key to create a mirror image of the selected stitch pattern. If the key 91 display is light gray, a mirror image of the selected stitch pattern cannot be sewn. s Automatic thread Press this key to set the automatic thread cutting function. Set the automatic 82 cutting key thread cutting function before sewing to have the machine automatically sew reinforcement stitches at the beginning and end of sewing (depending on the pattern, the machine may sew reverse stitches) and trim the threads after sewing. t Automatic Press this key to use the automatic reinforcement stitching (reverse stitching) 81 reinforcement stitch setting. If you select this setting before sewing, the machine will automatically key sew reinforcement stitches at the beginning and end of sewing (depending on the pattern, the machine may sew reverse stitches). u Free motion mode key Press this key to enter free motion sewing mode. 116 The presser foot is raised to an appropriate height and the feed dog is lowered for free motion quilting. v Pivot key Press this key to select the pivot setting. When the pivot setting is selected, 84 stopping the machine lowers the needle and slightly raises the presser foot automatically. In addition, when sewing is restarted, the presser foot is automatically lowered. • If this key appears as , the pivot function cannot be used. • Be sure the needle position on page 36 of Machine Settings is set to the down position. w Pattern display size Shows the approximate size of the pattern selected. 91 : Nearly the same size as the sewn pattern : 1/2 the size of the sewn pattern : 1/4 the size of the sewn pattern * The actual size of the sewn pattern may differ depending on the type of fabric and thread that is used. x Scroll key Press or , to move one page at a time, or touch anywhere on the bar to jump ahead for additional pages of stitches. 31
-
 1
1 -
2
-
3
-
4
-
5
-
6
-
7
-
8
-
9
-
10
-
11
-
12
-
13
-
14
-
15
-
16
-
17
-
18
-
19
-
20
-
21
-
22
-
23
-
24
-
25
-
26
-
27
-
 28
28 -
 29
29 -
 30
30 -
 31
31 -
 32
32 -
 33
33 -
 34
34 -
 35
35 -
 36
36 -
 37
37 -
 38
38 -
39
-
40
-
41
-
42
-
43
-
44
-
45
-
46
-
47
-
48
-
49
-
50
-
51
-
52
-
53
-
54
-
55
-
56
-
57
-
58
-
59
-
60
-
61
-
62
-
63
-
64
-
65
-
66
-
67
-
68
-
69
-
70
-
71
-
72
-
73
-
74
-
75
-
76
-
77
-
78
-
79
-
80
-
81
-
82
-
83
-
84
-
85
-
86
-
87
-
88
-
89
-
90
-
91
-
92
-
93
-
94
-
95
-
96
-
97
-
98
-
99
-
100
-
101
-
102
-
103
-
104
-
105
-
106
-
107
-
108
-
109
-
110
-
111
-
112
-
113
-
114
-
115
-
116
-
117
-
118
-
119
-
120
-
121
-
122
-
123
-
124
-
125
-
126
-
127
-
128
-
129
-
130
-
131
-
132
-
133
-
134
-
135
-
136
-
137
-
138
-
139
-
140
-
141
-
142
-
143
-
144
-
145
-
146
-
147
-
148
-
149
-
150
-
151
-
152
-
153
-
154
-
155
-
156
-
157
-
158
-
159
-
160
-
161
-
162
-
163
-
164
-
165
-
166
-
167
-
168
-
169
-
170
-
171
-
172
-
173
-
174
-
175
-
176
-
177
-
178
-
179
-
180
-
181
-
182
-
183
-
184
-
185
-
186
-
187
-
188
-
189
-
190
-
191
-
192
-
193
-
194
-
195
-
196
-
197
-
198
-
199
-
200
-
201
-
202
-
203
-
204
-
205
-
206
-
207
-
208
-
209
-
210
-
211
-
212
-
213
-
214
-
215
-
216
-
217
-
218
-
219
-
220
-
221
-
222
-
223
-
224
-
225
-
226
-
227
-
228
-
229
-
230
-
231
-
232
-
233
-
234
-
235
-
236
-
237
-
238
-
239
-
240
-
241
-
242
-
243
-
244
-
245
-
246
-
247
-
248
-
249
-
250
-
251
-
252
-
253
-
254
-
255
-
256
-
257
-
258
-
259
-
260
-
261
-
262
-
263
-
264
-
265
-
266
-
267
-
268
-
269
-
270
-
271
-
272
-
273
-
274
-
275
-
276
-
277
-
278
-
279
-
280
-
281
-
282
-
283
-
284
-
285
-
286
-
287
-
288
-
289
-
290
-
291
-
292
-
293
-
294
-
295
-
296
-
297
-
298
-
299
-
300
-
301
-
302
-
303
-
304
-
305
-
306
-
307
-
308
-
309
-
310
-
311
-
312
-
313
-
314
-
315
-
316
-
317
-
318
-
319
-
320
-
321
-
322
-
323
-
324
-
325
-
326
-
327
-
328
-
329
-
330
-
331
-
332
-
333
-
334
-
335
-
336
-
337
-
338
-
339
-
340
-
341
-
342
-
343
-
344
-
345
-
346
-
347
-
348
-
349
-
350
-
351
-
352
-
353
-
354
-
355
-
356
-
357
-
358
-
359
-
360
-
361
-
362
-
363
-
364
-
365
-
366
-
367
-
368
-
369
-
370
-
371
-
372
-
373
-
374
-
375
-
376
 |
 |
