Brother International Quattro 2 6700D Users Manual - English - Page 17
Embroidery Unit, Operation Buttons, CAUTION
 |
View all Brother International Quattro 2 6700D manuals
Add to My Manuals
Save this manual to your list of manuals |
Page 17 highlights
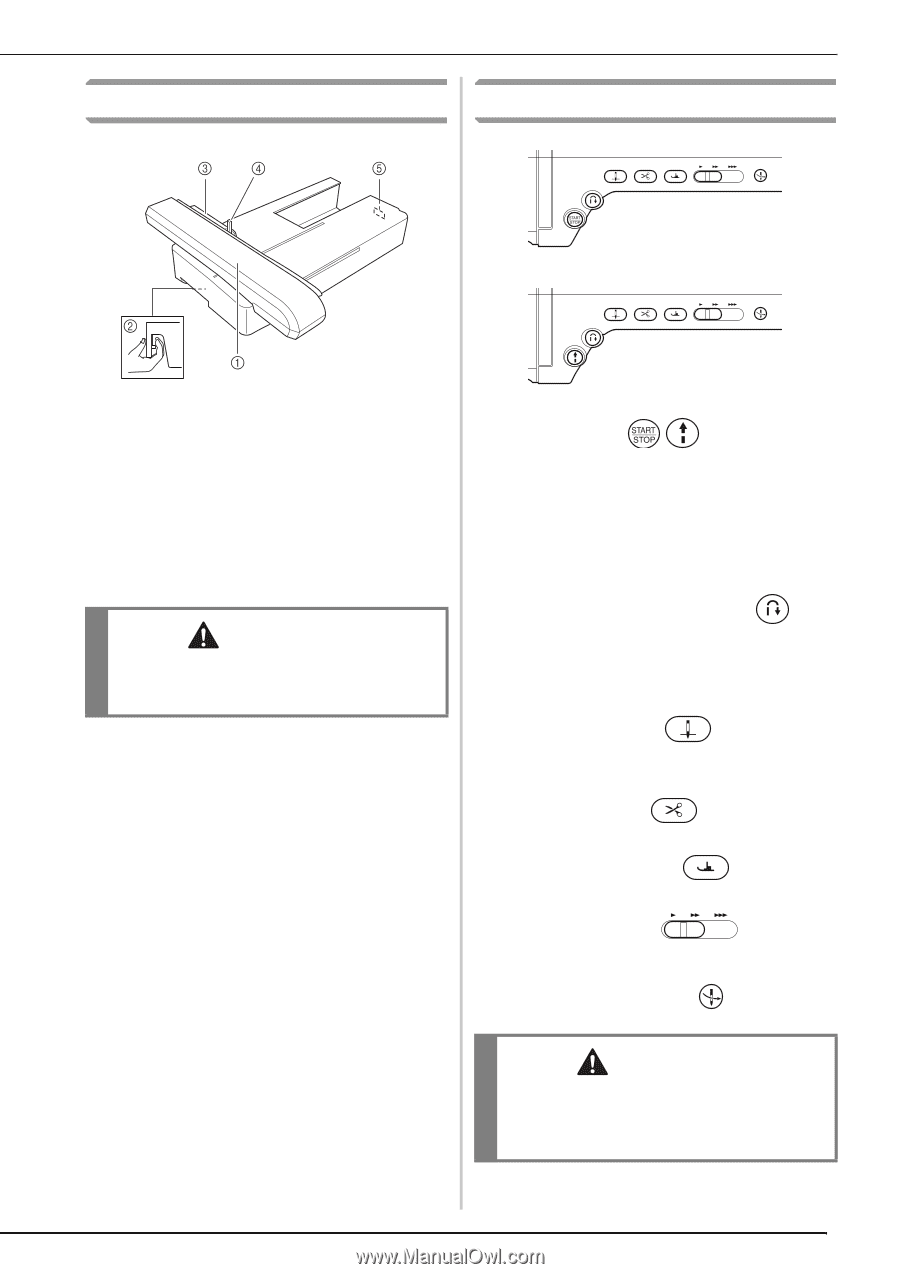
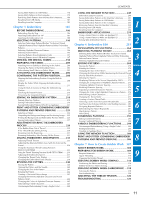
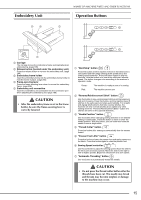
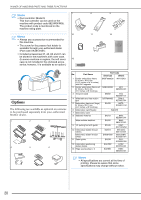
Embroidery Unit NAMES OF MACHINE PARTS AND THEIR FUNCTIONS Operation Buttons a Carriage The carriage moves the embroidery frame automatically when embroidering. (page 188) b Release button (located under the embroidery unit) Press the release button to remove the embroidery unit. (page 189) c Embroidery frame holder Insert the embroidery frame into the embroidery frame holder to hold the frame in place. (page 206) d Frame-securing lever Press the frame-securing lever down to secure the embroidery frame. (page 206) e Embroidery unit connection Insert the embroidery unit connection into the connection port when attaching the embroidery unit. (page 188) CAUTION • After the embroidery frame is set in the frame holder, be sure the frame-securing lever is correctly lowered. a "Start/Stop" button Press this button and the machine will sew a few stitches at a slow speed and then begin sewing at the speed set by the sewing speed controller. Press the button again to stop the machine. Hold the button in to sew at the machine's slowest speed. The button changes color according to the machine's operation mode. Green: The machine is ready to sew or is sewing. Red: The machine cannot sew. b "Reverse/Reinforcement Stitch" button Use this button to sew reinforcement stitches at the beginning and end of sewing. Press this button, and the machine sews 3 stitches in the same spot and stops automatically. For straight and zigzag stitch patterns that take reverse stitches, the machine will sew reverse stitches at low speed only while holding down the "Reverse/Reinforcement Stitch" button (the stitches are sewn in the opposite direction). c "Needle Position" button Use this button when changing sewing direction or for detailed sewing in small areas. Press this button to raise or lower the needle position. With this button, you can lower and raise the needle to sew a single stitch. d "Thread Cutter" button Press this button after sewing to automatically trim the excess thread. e "Presser Foot Lifter" button Press this button to lower the presser foot and apply pressure to the fabric. Press this button again to raise the presser foot. f Sewing Speed controller Use this controller to adjust the sewing speed. Move the slide to the left to sew at slower speeds. Move the slide to the right to sew at higher speeds. Beginners should sew at a slow speed. g "Automatic Threading" button Use this button to automatically thread the needle. CAUTION • Do not press the thread cutter button after the threads have been cut. The needle may break and threads may become tangled, or damage to the machine may occur. 15
-
 1
1 -
2
-
3
-
4
-
5
-
6
-
7
-
8
-
9
-
10
-
11
-
 12
12 -
 13
13 -
 14
14 -
 15
15 -
 16
16 -
 17
17 -
 18
18 -
 19
19 -
 20
20 -
 21
21 -
 22
22 -
23
-
24
-
25
-
26
-
27
-
28
-
29
-
30
-
31
-
32
-
33
-
34
-
35
-
36
-
37
-
38
-
39
-
40
-
41
-
42
-
43
-
44
-
45
-
46
-
47
-
48
-
49
-
50
-
51
-
52
-
53
-
54
-
55
-
56
-
57
-
58
-
59
-
60
-
61
-
62
-
63
-
64
-
65
-
66
-
67
-
68
-
69
-
70
-
71
-
72
-
73
-
74
-
75
-
76
-
77
-
78
-
79
-
80
-
81
-
82
-
83
-
84
-
85
-
86
-
87
-
88
-
89
-
90
-
91
-
92
-
93
-
94
-
95
-
96
-
97
-
98
-
99
-
100
-
101
-
102
-
103
-
104
-
105
-
106
-
107
-
108
-
109
-
110
-
111
-
112
-
113
-
114
-
115
-
116
-
117
-
118
-
119
-
120
-
121
-
122
-
123
-
124
-
125
-
126
-
127
-
128
-
129
-
130
-
131
-
132
-
133
-
134
-
135
-
136
-
137
-
138
-
139
-
140
-
141
-
142
-
143
-
144
-
145
-
146
-
147
-
148
-
149
-
150
-
151
-
152
-
153
-
154
-
155
-
156
-
157
-
158
-
159
-
160
-
161
-
162
-
163
-
164
-
165
-
166
-
167
-
168
-
169
-
170
-
171
-
172
-
173
-
174
-
175
-
176
-
177
-
178
-
179
-
180
-
181
-
182
-
183
-
184
-
185
-
186
-
187
-
188
-
189
-
190
-
191
-
192
-
193
-
194
-
195
-
196
-
197
-
198
-
199
-
200
-
201
-
202
-
203
-
204
-
205
-
206
-
207
-
208
-
209
-
210
-
211
-
212
-
213
-
214
-
215
-
216
-
217
-
218
-
219
-
220
-
221
-
222
-
223
-
224
-
225
-
226
-
227
-
228
-
229
-
230
-
231
-
232
-
233
-
234
-
235
-
236
-
237
-
238
-
239
-
240
-
241
-
242
-
243
-
244
-
245
-
246
-
247
-
248
-
249
-
250
-
251
-
252
-
253
-
254
-
255
-
256
-
257
-
258
-
259
-
260
-
261
-
262
-
263
-
264
-
265
-
266
-
267
-
268
-
269
-
270
-
271
-
272
-
273
-
274
-
275
-
276
-
277
-
278
-
279
-
280
-
281
-
282
-
283
-
284
-
285
-
286
-
287
-
288
-
289
-
290
-
291
-
292
-
293
-
294
-
295
-
296
-
297
-
298
-
299
-
300
-
301
-
302
-
303
-
304
-
305
-
306
-
307
-
308
-
309
-
310
-
311
-
312
-
313
-
314
-
315
-
316
-
317
-
318
-
319
-
320
-
321
-
322
-
323
-
324
-
325
-
326
-
327
-
328
-
329
-
330
-
331
-
332
-
333
-
334
-
335
-
336
-
337
-
338
-
339
-
340
-
341
-
342
-
343
-
344
-
345
-
346
-
347
-
348
-
349
-
350
-
351
-
352
-
353
-
354
-
355
-
356
-
357
-
358
-
359
-
360
-
361
-
362
-
363
-
364
-
365
-
366
-
367
-
368
-
369
-
370
-
371
-
372
-
373
-
374
-
375
-
376
 |
 |