Canon 1629B001 XH G1 XH A1 Instruction Manual - Page 25
Changing Settings with the MENU Button
 |
UPC - 013803071771
View all Canon 1629B001 manuals
Add to My Manuals
Save this manual to your list of manuals |
Page 25 highlights
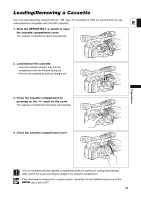
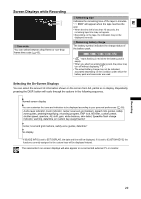
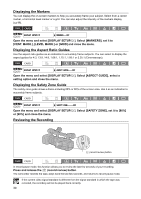
Changing Settings with the MENU Button Many of the camcorder's functions can be changed from the on-screen menu. E SELECT/SET dial MENU button Selecting Menus and Settings 1. Press the MENU button to open the menu. 2. Turn the SELECT/SET dial to select a submenu and press the dial. 3. Turn the SELECT/SET dial to select a menu item and press the dial. 4. Turn the SELECT/SET dial to select a setting option and press the dial. 5. Press the MENU button to close the menu. The , and displays at the bottom of the screen will give you additional indications about what buttons to operate during each menu setting. You may find it more convenient to use the wireless controller to operate the menu. Press the MENU button on the wireless controller to open or close the menu. Use the menu selection buttons of the wireless controller instead of the SELECT/SET dial, and press the SET button on the wireless controller to save the settings or make a selection. Unavailable items will appear grayed out. Pressing the MENU button at any time closes the menu. Preparations 25
-
 1
1 -
2
-
3
-
4
-
5
-
6
-
7
-
8
-
9
-
10
-
11
-
12
-
13
-
14
-
15
-
16
-
17
-
18
-
19
-
 20
20 -
 21
21 -
 22
22 -
 23
23 -
 24
24 -
 25
25 -
 26
26 -
 27
27 -
 28
28 -
 29
29 -
 30
30 -
31
-
32
-
33
-
34
-
35
-
36
-
37
-
38
-
39
-
40
-
41
-
42
-
43
-
44
-
45
-
46
-
47
-
48
-
49
-
50
-
51
-
52
-
53
-
54
-
55
-
56
-
57
-
58
-
59
-
60
-
61
-
62
-
63
-
64
-
65
-
66
-
67
-
68
-
69
-
70
-
71
-
72
-
73
-
74
-
75
-
76
-
77
-
78
-
79
-
80
-
81
-
82
-
83
-
84
-
85
-
86
-
87
-
88
-
89
-
90
-
91
-
92
-
93
-
94
-
95
-
96
-
97
-
98
-
99
-
100
-
101
-
102
-
103
-
104
-
105
-
106
-
107
-
108
-
109
-
110
-
111
-
112
-
113
-
114
-
115
-
116
-
117
-
118
-
119
-
120
-
121
-
122
-
123
-
124
-
125
-
126
-
127
-
128
-
129
-
130
-
131
-
132
-
133
-
134
-
135
-
136
-
137
-
138
-
139
-
140
-
141
-
142
-
143
-
144
-
145
-
146
-
147
-
148
-
149
-
150
-
151
-
152
-
153
-
154
-
155
-
156
-
157
-
158
-
159
-
160
-
161
-
162
-
163
-
164
 |
 |
