Canon 1629B001 XH G1 XH A1 Instruction Manual - Page 65
Using the Color Correction
 |
UPC - 013803071771
View all Canon 1629B001 manuals
Add to My Manuals
Save this manual to your list of manuals |
Page 65 highlights
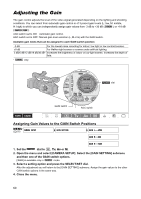
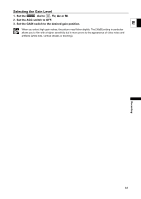
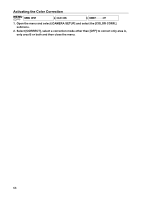
Using the Color Correction With the color correction function you can set the camcorder to detect the characteristics of a certain E color or pattern (color phase, chroma, area and Y level) and correct them automatically when recording. You can set the color correction for up to two different colors (A and B). When determining the color to be corrected, the areas that will be corrected appear on the screen as a zebra pattern alternating with the normal picture. On a connected monitor or computer, those areas will appear instead as white areas alternating with the normal picture. Recording Determining the Color to be Corrected MENU ( 25) CAMERA SETUP COLOR CORR. ···· ···· A AREA SEL. COLOR PHASE 0 B AREA SEL. CHROMA + AREA + Y LEVEL + 1. Open the menu and select [CAMERA SETUP]. Select the [COLOR CORR.] submenu and then select [A AREA SEL.] or [B AREA SEL.]. 2. Select each setting option, adjust the levels as necessary and close the menu. [COLOR PHASE]: Select the basic color phase (0-15) of the color to be detected. Use the following values as an approximate reference: 0=purple, 3=red, 6=orange, 9=green, 12=blue. [CHROMA]: Adjust the color saturation for the color to be detected. The more you adjust to [+], the area detected will extend to include more vivid and richer colors. [AREA]: Adjust the color range for the color to be detected. Adjusting to [+] detects a wider color range, and to [-] a narrower color range. [Y LEVEL]: Adjust the brightness for the color to be detected. Adjusting to [+] detects brighter colors, and to [-] detects darker colors. Adjusting the Color Correction MENU ( 25) CAMERA SETUP COLOR CORR. ···· ···· A AREA REV. R GAIN + B AREA REV. B GAIN + 1. Open the menu and select [CAMERA SETUP]. Select the [COLOR CORR.] submenu and then select [A AREA REV.] or [B AREA REV.]. 2. Select the color gain options, adjust the levels as necessary and close the menu. [R GAIN]: Adjust the red gain of the detected area. Adjusting to [+] results in stronger red tones, and to [-] in stronger cyan tones. [B GAIN]: Adjust the blue gain of the detected area. Adjusting to [+] results in stronger blue tones, and to [-] in stronger yellow tones. 65
-
 1
1 -
2
-
3
-
4
-
5
-
6
-
7
-
8
-
9
-
10
-
11
-
12
-
13
-
14
-
15
-
16
-
17
-
18
-
19
-
20
-
21
-
22
-
23
-
24
-
25
-
26
-
27
-
28
-
29
-
30
-
31
-
32
-
33
-
34
-
35
-
36
-
37
-
38
-
39
-
40
-
41
-
42
-
43
-
44
-
45
-
46
-
47
-
48
-
49
-
50
-
51
-
52
-
53
-
54
-
55
-
56
-
57
-
58
-
59
-
 60
60 -
 61
61 -
 62
62 -
 63
63 -
 64
64 -
 65
65 -
 66
66 -
 67
67 -
 68
68 -
 69
69 -
 70
70 -
71
-
72
-
73
-
74
-
75
-
76
-
77
-
78
-
79
-
80
-
81
-
82
-
83
-
84
-
85
-
86
-
87
-
88
-
89
-
90
-
91
-
92
-
93
-
94
-
95
-
96
-
97
-
98
-
99
-
100
-
101
-
102
-
103
-
104
-
105
-
106
-
107
-
108
-
109
-
110
-
111
-
112
-
113
-
114
-
115
-
116
-
117
-
118
-
119
-
120
-
121
-
122
-
123
-
124
-
125
-
126
-
127
-
128
-
129
-
130
-
131
-
132
-
133
-
134
-
135
-
136
-
137
-
138
-
139
-
140
-
141
-
142
-
143
-
144
-
145
-
146
-
147
-
148
-
149
-
150
-
151
-
152
-
153
-
154
-
155
-
156
-
157
-
158
-
159
-
160
-
161
-
162
-
163
-
164
 |
 |
