Canon 1629B001 XH G1 XH A1 Instruction Manual - Page 47
Audio Recording
 |
UPC - 013803071771
View all Canon 1629B001 manuals
Add to My Manuals
Save this manual to your list of manuals |
Page 47 highlights
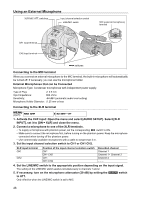
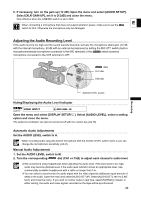
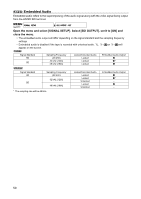
Audio Recording You can select to record audio from the built-in microphone or from an external microphone connected either to the MIC terminal or to the XLR terminal. E While recording, the sampling frequency of the output signal from the HD/SD SDI terminal will be 48 kHz regardless of the audio input. Recording HDV The audio transfer rate is 384 Kbps and the sampling frequency is 48 kHz. DV You can choose to record in 16 bit audio mode (sampling frequency 48 kHz), or 12 bit audio mode (sampling frequency 32 kHz). • In 12 bit audio mode, only audio channels 1 and 2 are used for recording, leaving the adjacent channels available for adding a new audio track. • Audio cannot be dubbed using this camcorder. • Audio recorded with this camcorder is "locked" audio except for the audio recorded from an analog input or from a digital input if you select the Unlock mode. SD Selecting the DV Audio Mode MENU ( 25) AUDIO SETUP DV AUDIO•••16bit Open the menu and select [AUDIO SETUP]. Select [DV AUDIO], select a setting option and close the menu. Selecting the Microphone's Audio Recording Mode You can select the most appropriate setting, given your recording conditions, for recording audio with the built-in microphone. MENU ( 25) AUDIO SETUP MIC MODE•••NORMAL Open the menu and select [AUDIO SETUP]. Select [MIC MODE], select a setting option and close the menu. [NORMAL]: To record audio under usual conditions. [VOICE ]: To record mainly people's voices. [WS ]: To reduce the background sound of wind when recording outdoors in windy surroundings (for example, on a beach or close to buildings). Note that when you use the wind screen some lowfrequency sounds may be suppressed along with the sound of wind. Selecting the Sensitivity of the Built-In Microphone You can change the sensitivity of the built-in microphone to [NORMAL] or [HIGH] (+6 dB) to match the recording conditions. MENU ( 25) AUDIO SETUP MIC SENSIT.•••NORMAL Open the menu and select [AUDIO SETUP]. Select [MIC SENSIT.], select a setting option and close the menu. [NORMAL]: To record audio under usual conditions. [HIGH]: To record audio at a higher volume. 47
-
 1
1 -
2
-
3
-
4
-
5
-
6
-
7
-
8
-
9
-
10
-
11
-
12
-
13
-
14
-
15
-
16
-
17
-
18
-
19
-
20
-
21
-
22
-
23
-
24
-
25
-
26
-
27
-
28
-
29
-
30
-
31
-
32
-
33
-
34
-
35
-
36
-
37
-
38
-
39
-
40
-
41
-
 42
42 -
 43
43 -
 44
44 -
 45
45 -
 46
46 -
 47
47 -
 48
48 -
 49
49 -
 50
50 -
 51
51 -
 52
52 -
53
-
54
-
55
-
56
-
57
-
58
-
59
-
60
-
61
-
62
-
63
-
64
-
65
-
66
-
67
-
68
-
69
-
70
-
71
-
72
-
73
-
74
-
75
-
76
-
77
-
78
-
79
-
80
-
81
-
82
-
83
-
84
-
85
-
86
-
87
-
88
-
89
-
90
-
91
-
92
-
93
-
94
-
95
-
96
-
97
-
98
-
99
-
100
-
101
-
102
-
103
-
104
-
105
-
106
-
107
-
108
-
109
-
110
-
111
-
112
-
113
-
114
-
115
-
116
-
117
-
118
-
119
-
120
-
121
-
122
-
123
-
124
-
125
-
126
-
127
-
128
-
129
-
130
-
131
-
132
-
133
-
134
-
135
-
136
-
137
-
138
-
139
-
140
-
141
-
142
-
143
-
144
-
145
-
146
-
147
-
148
-
149
-
150
-
151
-
152
-
153
-
154
-
155
-
156
-
157
-
158
-
159
-
160
-
161
-
162
-
163
-
164
 |
 |
