Canon 1629B001 XH G1 XH A1 Instruction Manual - Page 89
kHz Reference Audio Signal
 |
UPC - 013803071771
View all Canon 1629B001 manuals
Add to My Manuals
Save this manual to your list of manuals |
Page 89 highlights
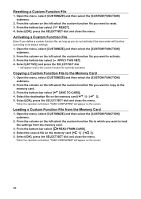
14 [1kHz TONE] 1 kHz Reference Audio Signal Selects the strength of the audio signal. Setting Options: 00 - OFF, 01 - -12dB, 02 - -20dB. 15 [WIRELESS REMOTE] Wireless Remote Controller E Selects the remote sensor mode that the camcorder will accept. When set to [OFF ] the camcorder will not accept commands from wireless controllers. Setting Options: 00 - 1, 01 - 2, 02 - OFF . 16 [POWER SAVE] Power Save Mode Activates the power save function so the camcorder automatically shuts off when powered by a battery and left without operation for approximately 5 minutes. Setting Options: 00 - ON, 01 - OFF. 17 [TALLY LAMP] Tally Lamp Selects the operation of the tally lamp. Even if set to [OFF], the tally lamp will turn on when receiving a command from the wireless controller. Setting Options: 00 - ON, 01 - BLINK, 02 - OFF. 18 [LED] LED Indicators Selects the operation of the LED indicators on the camcorder. When set to type 1 all LED indicators will be on, except for that of the HDV/DV terminal. When set to type 2, all LED indicators (including that of the HDV/DV terminal) will be on. Setting Options: 00 - TYPE 1, 01 - TYPE 2, 02 - OFF. 19 [BEEP] Beep Selects the volume for the camcorder's operations and warning beeps. Setting Options: 00 - OFF, 01 - LOW VOLUME, 02 - HIGH VOLUME. 20 [CHARACTER REC] Superimposing Character Recording Selects whether to embed the on-screen character displays (date and time) as part of the video recording. When set to [ON], the menu option [TV SCREEN] will not be available and [COMP.OUT] will automatically be set to [1080i/480i] and you will not be able to select [480i]. Setting Options: 00 - OFF, 01 - ON. Customization 89
-
 1
1 -
2
-
3
-
4
-
5
-
6
-
7
-
8
-
9
-
10
-
11
-
12
-
13
-
14
-
15
-
16
-
17
-
18
-
19
-
20
-
21
-
22
-
23
-
24
-
25
-
26
-
27
-
28
-
29
-
30
-
31
-
32
-
33
-
34
-
35
-
36
-
37
-
38
-
39
-
40
-
41
-
42
-
43
-
44
-
45
-
46
-
47
-
48
-
49
-
50
-
51
-
52
-
53
-
54
-
55
-
56
-
57
-
58
-
59
-
60
-
61
-
62
-
63
-
64
-
65
-
66
-
67
-
68
-
69
-
70
-
71
-
72
-
73
-
74
-
75
-
76
-
77
-
78
-
79
-
80
-
81
-
82
-
83
-
 84
84 -
 85
85 -
 86
86 -
 87
87 -
 88
88 -
 89
89 -
 90
90 -
 91
91 -
 92
92 -
 93
93 -
 94
94 -
95
-
96
-
97
-
98
-
99
-
100
-
101
-
102
-
103
-
104
-
105
-
106
-
107
-
108
-
109
-
110
-
111
-
112
-
113
-
114
-
115
-
116
-
117
-
118
-
119
-
120
-
121
-
122
-
123
-
124
-
125
-
126
-
127
-
128
-
129
-
130
-
131
-
132
-
133
-
134
-
135
-
136
-
137
-
138
-
139
-
140
-
141
-
142
-
143
-
144
-
145
-
146
-
147
-
148
-
149
-
150
-
151
-
152
-
153
-
154
-
155
-
156
-
157
-
158
-
159
-
160
-
161
-
162
-
163
-
164
 |
 |