Canon Color imageCLASS 8180c imageCLASS MF8180c Basic Guide - Page 131
Step 10 and start with Step 11, p. 9-16 to remove the jammed paper. In doing so
 |
View all Canon Color imageCLASS 8180c manuals
Add to My Manuals
Save this manual to your list of manuals |
Page 131 highlights
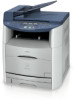
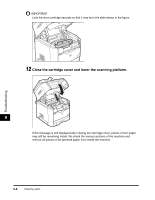
6 Place the drum cartridge in the protective bag. 7 Press the green lock release lever a and remove the jammed paper b. b a IMPORTANT 9 If no paper jam has been found after performing the procedure up to this step, the paper may be jammed in the fuser unit at the back of the machine. In this case, skip Step 8 to Step 10 and start with Step 11 ( ➞ p. 9-16) to remove the jammed paper. In doing so, never close the cartridge cover. It may result in paper jams that are difficult to clear. Follow Step 8 to Step 10 to set the drum cartridge after removing the paper. Troubleshooting Clearing Jams 9-13
-
 1
1 -
2
-
3
-
4
-
5
-
6
-
7
-
8
-
9
-
10
-
11
-
12
-
13
-
14
-
15
-
16
-
17
-
18
-
19
-
20
-
21
-
22
-
23
-
24
-
25
-
26
-
27
-
28
-
29
-
30
-
31
-
32
-
33
-
34
-
35
-
36
-
37
-
38
-
39
-
40
-
41
-
42
-
43
-
44
-
45
-
46
-
47
-
48
-
49
-
50
-
51
-
52
-
53
-
54
-
55
-
56
-
57
-
58
-
59
-
60
-
61
-
62
-
63
-
64
-
65
-
66
-
67
-
68
-
69
-
70
-
71
-
72
-
73
-
74
-
75
-
76
-
77
-
78
-
79
-
80
-
81
-
82
-
83
-
84
-
85
-
86
-
87
-
88
-
89
-
90
-
91
-
92
-
93
-
94
-
95
-
96
-
97
-
98
-
99
-
100
-
101
-
102
-
103
-
104
-
105
-
106
-
107
-
108
-
109
-
110
-
111
-
112
-
113
-
114
-
115
-
116
-
117
-
118
-
119
-
120
-
121
-
122
-
123
-
124
-
125
-
 126
126 -
 127
127 -
 128
128 -
 129
129 -
 130
130 -
 131
131 -
 132
132 -
 133
133 -
 134
134 -
 135
135 -
 136
136 -
137
-
138
-
139
-
140
-
141
-
142
-
143
-
144
-
145
-
146
-
147
-
148
-
149
-
150
-
151
-
152
-
153
-
154
-
155
-
156
-
157
-
158
-
159
-
160
-
161
-
162
-
163
-
164
-
165
-
166
-
167
-
168
-
169
-
170
-
171
-
172
-
173
-
174
 |
 |

Clearing Jams
9-13
Troubleshooting
9
6
Place the drum cartridge in the protective bag.
7
Press the green lock release lever
a
and remove the jammed
paper
b
.
IMPORTANT
If no paper jam has been found after performing the procedure up to this step, the paper
may be jammed in the fuser unit at the back of the machine. In this case, skip Step 8 to
Step 10 and start with Step 11 (
➞
p. 9-16) to remove the jammed paper. In doing so,
never close the cartridge cover. It may result in paper jams that are difficult to clear. Follow
Step 8 to Step 10 to set the drum cartridge after removing the paper.
a
b