Canon Color imageCLASS 8180c imageCLASS MF8180c Basic Guide - Page 138
Connect the power cord and all interface cables.
 |
View all Canon Color imageCLASS 8180c manuals
Add to My Manuals
Save this manual to your list of manuals |
Page 138 highlights
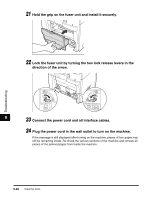
21 Hold the grip on the fuser unit and install it securely. 22 Lock the fuser unit by turning the two lock release levers in the direction of the arrow. Troubleshooting 9 23 Connect the power cord and all interface cables. 24 Plug the power cord in the wall outlet to turn on the machine. If the message is still displayed after turning on the machine, pieces of torn paper may still be remaining inside. Re-check the various sections of the machine and remove all pieces of the jammed paper from inside the machine. 9-20 Clearing Jams
-
 1
1 -
2
-
3
-
4
-
5
-
6
-
7
-
8
-
9
-
10
-
11
-
12
-
13
-
14
-
15
-
16
-
17
-
18
-
19
-
20
-
21
-
22
-
23
-
24
-
25
-
26
-
27
-
28
-
29
-
30
-
31
-
32
-
33
-
34
-
35
-
36
-
37
-
38
-
39
-
40
-
41
-
42
-
43
-
44
-
45
-
46
-
47
-
48
-
49
-
50
-
51
-
52
-
53
-
54
-
55
-
56
-
57
-
58
-
59
-
60
-
61
-
62
-
63
-
64
-
65
-
66
-
67
-
68
-
69
-
70
-
71
-
72
-
73
-
74
-
75
-
76
-
77
-
78
-
79
-
80
-
81
-
82
-
83
-
84
-
85
-
86
-
87
-
88
-
89
-
90
-
91
-
92
-
93
-
94
-
95
-
96
-
97
-
98
-
99
-
100
-
101
-
102
-
103
-
104
-
105
-
106
-
107
-
108
-
109
-
110
-
111
-
112
-
113
-
114
-
115
-
116
-
117
-
118
-
119
-
120
-
121
-
122
-
123
-
124
-
125
-
126
-
127
-
128
-
129
-
130
-
131
-
132
-
 133
133 -
 134
134 -
 135
135 -
 136
136 -
 137
137 -
 138
138 -
 139
139 -
 140
140 -
 141
141 -
 142
142 -
 143
143 -
144
-
145
-
146
-
147
-
148
-
149
-
150
-
151
-
152
-
153
-
154
-
155
-
156
-
157
-
158
-
159
-
160
-
161
-
162
-
163
-
164
-
165
-
166
-
167
-
168
-
169
-
170
-
171
-
172
-
173
-
174
 |
 |

Clearing Jams
9-20
Troubleshooting
9
21
Hold the grip on the fuser unit and install it securely.
22
Lock the fuser unit by turning the two lock release levers in the
direction of the arrow.
23
Connect the power cord and all interface cables.
24
Plug the power cord in the wall outlet to turn on the machine.
If the message is still displayed after turning on the machine, pieces of torn paper may
still be remaining inside. Re-check the various sections of the machine and remove all
pieces of the jammed paper from inside the machine.