Canon Color imageCLASS 8180c imageCLASS MF8180c Basic Guide - Page 23
Lock Release Levers, Introduction, Rear View
 |
View all Canon Color imageCLASS 8180c manuals
Add to My Manuals
Save this manual to your list of manuals |
Page 23 highlights
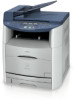
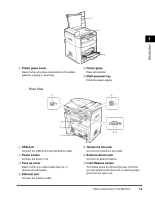
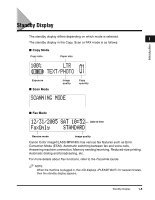
Introduction a b 1 c a Platen glass cover Open it when you place documents on the platen glass for copying or scanning. Rear View a b Platen glass Place documents. c Multi-purpose tray Holds the paper supply. d b c g a USB port Connect the USB (Universal Serial Bus) cable. b Power socket Connect the power cord. c Face up cover Open it when you output paper face up, or remove jammed paper. d Ethernet port Connect the network cable. LINE EXT. ef e Telephone line jack Connect the telephone line cable. f External device jack Connect an external device. g Lock Release Levers Turn these levers to remove the fuser unit when you are replacing the fuser unit or clearing paper jams from the fuser unit. Main Components of the Machine 1-3
-
 1
1 -
2
-
3
-
4
-
5
-
6
-
7
-
8
-
9
-
10
-
11
-
12
-
13
-
14
-
15
-
16
-
17
-
 18
18 -
 19
19 -
 20
20 -
 21
21 -
 22
22 -
 23
23 -
 24
24 -
 25
25 -
 26
26 -
 27
27 -
 28
28 -
29
-
30
-
31
-
32
-
33
-
34
-
35
-
36
-
37
-
38
-
39
-
40
-
41
-
42
-
43
-
44
-
45
-
46
-
47
-
48
-
49
-
50
-
51
-
52
-
53
-
54
-
55
-
56
-
57
-
58
-
59
-
60
-
61
-
62
-
63
-
64
-
65
-
66
-
67
-
68
-
69
-
70
-
71
-
72
-
73
-
74
-
75
-
76
-
77
-
78
-
79
-
80
-
81
-
82
-
83
-
84
-
85
-
86
-
87
-
88
-
89
-
90
-
91
-
92
-
93
-
94
-
95
-
96
-
97
-
98
-
99
-
100
-
101
-
102
-
103
-
104
-
105
-
106
-
107
-
108
-
109
-
110
-
111
-
112
-
113
-
114
-
115
-
116
-
117
-
118
-
119
-
120
-
121
-
122
-
123
-
124
-
125
-
126
-
127
-
128
-
129
-
130
-
131
-
132
-
133
-
134
-
135
-
136
-
137
-
138
-
139
-
140
-
141
-
142
-
143
-
144
-
145
-
146
-
147
-
148
-
149
-
150
-
151
-
152
-
153
-
154
-
155
-
156
-
157
-
158
-
159
-
160
-
161
-
162
-
163
-
164
-
165
-
166
-
167
-
168
-
169
-
170
-
171
-
172
-
173
-
174
 |
 |

Main Components of the Machine
1-3
Introduction
1
Rear View
a
Platen glass cover
Open it when you place documents on the platen
glass for copying or scanning.
b
Platen glass
Place documents.
c
Multi-purpose tray
Holds the paper supply.
a
USB port
Connect the USB (Universal Serial Bus) cable.
b
Power socket
Connect the power cord.
c
Face up cover
Open it when you output paper face up, or
remove jammed paper.
d
Ethernet port
Connect the network cable.
e
Telephone line jack
Connect the telephone line cable.
f
External device jack
Connect an external device.
g
Lock Release Levers
Turn these levers to remove the fuser unit when
you are replacing the fuser unit or clearing paper
jams from the fuser unit.
a
b
c
LINE
EXT.
a
b
c
d
ef
g