Canon Color imageCLASS 8180c imageCLASS MF8180c Basic Guide - Page 96
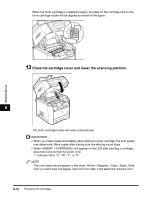
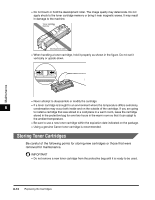
Close the cartridge cover and lower the scanning platform., indicates either C, M, Y, or K.
 |
View all Canon Color imageCLASS 8180c manuals
Add to My Manuals
Save this manual to your list of manuals |
Page 96 highlights
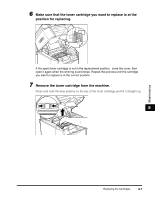
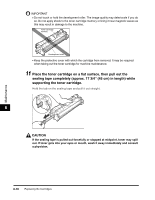
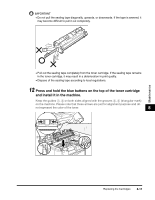
Maintenance When the toner cartridge is installed properly, the label on the cartridge and on the toner cartridge holder will be aligned as shown in the figure. 13 Close the cartridge cover and lower the scanning platform. 8 The toner cartridge holder will rotate automatically. IMPORTANT • When you make copies immediately after replacing a toner cartridge, the print quality may deteriorate. Make copies after making sure the whirring sound stops. • When still appears in the LCD after inserting a cartridge, disconnect and connect the power cord. ∗: indicates either "C", "M", "Y", or "K". NOTE The color labels should appear in this order: Yellow > Magenta > Cyan > Black. If the color you want does not appear, start over from step 1 and select the required color. 8-12 Replacing the Cartridges
-
 1
1 -
2
-
3
-
4
-
5
-
6
-
7
-
8
-
9
-
10
-
11
-
12
-
13
-
14
-
15
-
16
-
17
-
18
-
19
-
20
-
21
-
22
-
23
-
24
-
25
-
26
-
27
-
28
-
29
-
30
-
31
-
32
-
33
-
34
-
35
-
36
-
37
-
38
-
39
-
40
-
41
-
42
-
43
-
44
-
45
-
46
-
47
-
48
-
49
-
50
-
51
-
52
-
53
-
54
-
55
-
56
-
57
-
58
-
59
-
60
-
61
-
62
-
63
-
64
-
65
-
66
-
67
-
68
-
69
-
70
-
71
-
72
-
73
-
74
-
75
-
76
-
77
-
78
-
79
-
80
-
81
-
82
-
83
-
84
-
85
-
86
-
87
-
88
-
89
-
90
-
 91
91 -
 92
92 -
 93
93 -
 94
94 -
 95
95 -
 96
96 -
 97
97 -
 98
98 -
 99
99 -
 100
100 -
 101
101 -
102
-
103
-
104
-
105
-
106
-
107
-
108
-
109
-
110
-
111
-
112
-
113
-
114
-
115
-
116
-
117
-
118
-
119
-
120
-
121
-
122
-
123
-
124
-
125
-
126
-
127
-
128
-
129
-
130
-
131
-
132
-
133
-
134
-
135
-
136
-
137
-
138
-
139
-
140
-
141
-
142
-
143
-
144
-
145
-
146
-
147
-
148
-
149
-
150
-
151
-
152
-
153
-
154
-
155
-
156
-
157
-
158
-
159
-
160
-
161
-
162
-
163
-
164
-
165
-
166
-
167
-
168
-
169
-
170
-
171
-
172
-
173
-
174
 |
 |
