Canon Color imageCLASS MF9170c imageCLASS MF9170c/MF9150c/MF8450c Starter Guid - Page 14
Load Paper
 |
View all Canon Color imageCLASS MF9170c manuals
Add to My Manuals
Save this manual to your list of manuals |
Page 14 highlights
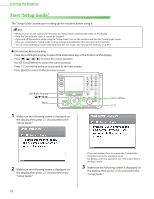
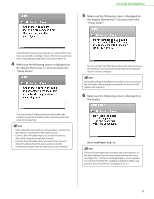
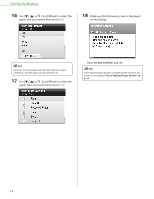
2 Set Up the Machine Load Paper This section describes the procedures for making paper and paper size settings in the "Setup Guide." Animated screens are included with each step described in the "Setup Guide." 1 Make sure the following screen is displayed on the display, then press [OK] to proceed to the "Setup Guide." 4 Press [OK] to proceed to the "Setup Guide." 5 Hold the lock release lever of the side paper guides (A) and slide the guides to the mark for the size of the paper to be loaded. The side paper guides move together. 2 Pull out the paper drawer until it stops. 3 Hold the paper drawer with both hands and remove it from the machine. Make sure to set the guides to the mark for the size of the paper to be loaded correctly. If the guides are positioned incorrectly, it may cause paper jams, dirty prints, etc. 6 Press [OK] to proceed to the "Setup Guide." 7 Hold the lock release lever of the rear paper guides (A) and slide the guides to the mark for the size of the paper to be loaded. Make sure to take the paper drawer out of the machine before loading paper. If paper is loaded while the paper drawer is partially pulled out, the paper drawer may fall, resulting in damage to the machine or personal injury. 12 Make sure to set the guides to the mark for the size of the paper to be loaded correctly. If the guides are positioned incorrectly, it may cause paper jams, dirty prints, etc.
-
 1
1 -
2
-
3
-
4
-
5
-
6
-
7
-
8
-
 9
9 -
 10
10 -
 11
11 -
 12
12 -
 13
13 -
 14
14 -
 15
15 -
 16
16 -
 17
17 -
 18
18 -
 19
19 -
20
-
21
-
22
-
23
-
24
-
25
-
26
-
27
-
28
-
29
-
30
-
31
-
32
-
33
-
34
-
35
-
36
-
37
-
38
-
39
-
40
-
41
-
42
-
43
-
44
-
45
-
46
-
47
-
48
-
49
-
50
-
51
-
52
-
53
-
54
-
55
-
56
-
57
-
58
-
59
-
60
 |
 |
