Canon Color imageCLASS MF9170c imageCLASS MF9170c/MF9150c/MF8450c Starter Guid - Page 31
Adjust Color with “Auto Gradation Correction”, Full Correction
 |
View all Canon Color imageCLASS MF9170c manuals
Add to My Manuals
Save this manual to your list of manuals |
Page 31 highlights
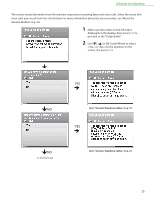
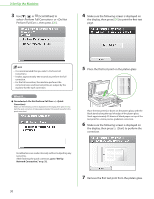
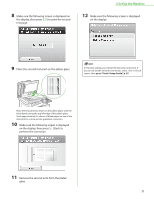
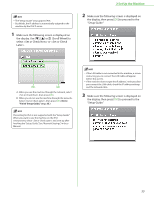
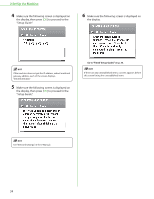
2 Set Up the Machine Adjust Color with "Auto Gradation Correction" When using the machine for the first time, it is necessary to adjust the gradation in order to obtain the optimum copy or print results. There are two types of gradation adjustments that can be made: Full Correction and Quick Correction. ● Full Correction This is a precise adjustment. The procedure involves making test prints and placing them on the feeder for scanning. Once this is complete, the machine automatically corrects the irregularities. Make sure that you place the test prints properly. Accurate adjustments cannot be made if the test prints are not scanned correctly. ● Quick Correction This is a quick and simple adjustment. Adjustment is made internally without outputting any test prints. It is recommended that you select when performing an automatic gradation adjustment. Select for a quick, but less complete adjustment between regular full corrections. 1 Make sure the following screen is displayed on the display, then press [OK] to proceed to the "Setup Guide." 2 Make sure the following screen is displayed on the display, then press [OK] to proceed to the "Setup Guide." 29
-
 1
1 -
2
-
3
-
4
-
5
-
6
-
7
-
8
-
9
-
10
-
11
-
12
-
13
-
14
-
15
-
16
-
17
-
18
-
19
-
20
-
21
-
22
-
23
-
24
-
25
-
 26
26 -
 27
27 -
 28
28 -
 29
29 -
 30
30 -
 31
31 -
 32
32 -
 33
33 -
 34
34 -
 35
35 -
 36
36 -
37
-
38
-
39
-
40
-
41
-
42
-
43
-
44
-
45
-
46
-
47
-
48
-
49
-
50
-
51
-
52
-
53
-
54
-
55
-
56
-
57
-
58
-
59
-
60
 |
 |