Canon DC320 DC310/DC320 Instruction Manual - Page 19
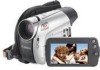
Preparing the Accessories, to release the battery
 |
UPC - 013803091694
View all Canon DC320 manuals
Add to My Manuals
Save this manual to your list of manuals |
Page 19 highlights
ONCE THE BATTERY PACK IS FULLY CHARGED 1 Disconnect the compact power adapter from the camcorder. 2 Unplug the power cord from the power outlet and the compact power adapter. TO REMOVE THE BATTERY PACK Press BATT. to release the battery pack. Slide the battery pack down and then pull it out. IMPORTANT • Turn off the camcorder before connecting or disconnecting the compact power adapter. After you turn the switch to , important file allocation data is updated on the disc. Be sure to wait until the PLAY and CAMERA mode indicators are completely off. • You may hear some noise from the compact power adapter during use. This is not a malfunction. • We recommend charging the battery pack in temperatures between 10 °C and 30 °C (50 °F and 86 °F). Outside the temperature range of 0 °C to 40 °C (32 °F to 104 °F), the charging will not start. • Do not connect to the camcorder's DC IN terminal or to the compact power adapter any electrical equipment that is not expressly recommended for use with this camcorder. • To prevent equipment breakdowns and excessive heating, do not connect the supplied compact power adapter to voltage converters for overseas travels or special power sources such as those on aircraft and ships, DC-AC inverters, etc. NOTES • The CHARGE indicator also serves as a rough estimate of the charge status. Continuously on: Battery pack fully charged. Two quick flashes at 1-second intervals: Battery pack at least 50% charged. If the indicator flashes quickly but not exactly in this pattern, refer to Troubleshooting ( 70). One flash at 1-second intervals: Battery pack less than 50% charged. • We recommend that you prepare battery packs to last 2 to 3 times longer than you think you might need. • U.S.A. and Canada only: The Lithium ion/polymer battery that powers the product is recyclable. Please call 1-800-8-BATTERY for information on how to recycle this battery. Preparing the Accessories Fasten the grip belt. Adjust the grip belt so that you can reach the zoom lever with your index finger, and the Start/Stop button with your thumb. Preparations • 19
-
 1
1 -
2
-
3
-
4
-
5
-
6
-
7
-
8
-
9
-
10
-
11
-
12
-
13
-
 14
14 -
 15
15 -
 16
16 -
 17
17 -
 18
18 -
 19
19 -
 20
20 -
 21
21 -
 22
22 -
 23
23 -
 24
24 -
25
-
26
-
27
-
28
-
29
-
30
-
31
-
32
-
33
-
34
-
35
-
36
-
37
-
38
-
39
-
40
-
41
-
42
-
43
-
44
-
45
-
46
-
47
-
48
-
49
-
50
-
51
-
52
-
53
-
54
-
55
-
56
-
57
-
58
-
59
-
60
-
61
-
62
-
63
-
64
-
65
-
66
-
67
-
68
-
69
-
70
-
71
-
72
-
73
-
74
-
75
-
76
-
77
-
78
-
79
-
80
-
81
-
82
-
83
-
84
-
85
-
86
-
87
-
88
-
89
-
90
-
91
-
92
-
93
 |
 |