Canon DC320 DC310/DC320 Instruction Manual - Page 62
Playback on a TV Screen, Copying your Recordings to an External Video Recorder, Connecting, Playback
 |
UPC - 013803091694
View all Canon DC320 manuals
Add to My Manuals
Save this manual to your list of manuals |
Page 62 highlights
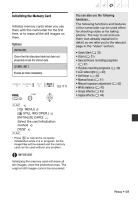
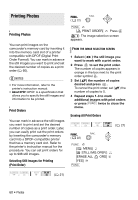
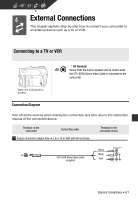
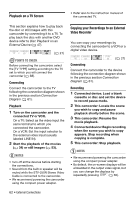
Playback on a TV Screen • Refer also to the instruction manual of the connected TV. This section explains how to play back the disc or still images with this camcorder by connecting it to a TV. To play back the disc with another DVD device refer to Disc Playback on an External Device ( 47). ( 21) POINTS TO CHECK Before connecting the camcorder, select the [TV TYPE] setting according to the TV set to which you will connect the camcorder ( 68). Connecting Connect the camcorder to the TV following the connection diagram shown in the previous section Connection Diagram ( 61). Playback 1 Turn on the camcorder and the connected TV or VCR. On a TV: Select as the video input the same terminal to which you connected the camcorder. On a VCR: Set the input selector to the external video input (usually labeled LINE IN). 2 Start the playback of the movies ( 34) or still images ( 53). NOTES • Turn off all the devices before starting the connections. • Sound from the built-in speaker will be muted while the STV-250N Stereo Video Cable is connected to the camcorder. • We recommend powering the camcorder using the compact power adapter. Copying your Recordings to an External Video Recorder You can copy your recordings by connecting the camcorder to a VCR or a digital video device. ( 21) Connecting Connect the camcorder to the device following the connection diagram shown in the previous section Connection Diagram ( 61). Recording 1 Connected device: Load a blank cassette or disc and set the device to record pause mode. 2 This camcorder: Locate the scene you wish to copy and pause playback shortly before the scene. 3 This camcorder: Resume the movie playback. 4 Connected device: Begin recording when the scene you wish to copy appears. Stop recording when copying is complete. 5 This camcorder: Stop playback. NOTES • We recommend powering the camcorder using the compact power adapter. • By default, the on-screen displays will be embedded in the output video signal, but you can change the displays by repeatedly pressing DISP. ( 36). 62 • External Connections
-
 1
1 -
2
-
3
-
4
-
5
-
6
-
7
-
8
-
9
-
10
-
11
-
12
-
13
-
14
-
15
-
16
-
17
-
18
-
19
-
20
-
21
-
22
-
23
-
24
-
25
-
26
-
27
-
28
-
29
-
30
-
31
-
32
-
33
-
34
-
35
-
36
-
37
-
38
-
39
-
40
-
41
-
42
-
43
-
44
-
45
-
46
-
47
-
48
-
49
-
50
-
51
-
52
-
53
-
54
-
55
-
56
-
 57
57 -
 58
58 -
 59
59 -
 60
60 -
 61
61 -
 62
62 -
 63
63 -
 64
64 -
 65
65 -
 66
66 -
 67
67 -
68
-
69
-
70
-
71
-
72
-
73
-
74
-
75
-
76
-
77
-
78
-
79
-
80
-
81
-
82
-
83
-
84
-
85
-
86
-
87
-
88
-
89
-
90
-
91
-
92
-
93
 |
 |