Canon DC320 DC310/DC320 Instruction Manual - Page 29
Video, Basic Recording, Shooting Video - dvd camcorder manual
 |
UPC - 013803091694
View all Canon DC320 manuals
Add to My Manuals
Save this manual to your list of manuals |
Page 29 highlights
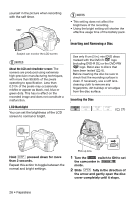
Video This chapter covers functions related to shooting and playing back movies - from basic recording and zooming to more advanced manual picture adjustments. Basic Recording Basic Recording Shooting Video Before You Begin Recording Make a test recording first to check if the camcorder operates correctly. Since recordings made on a DVD-R or DVD-R DL disc cannot be deleted, we recommend you use a DVD-RW disc to make the test recordings. ( 21) 1 Move the / switch to (movies). 2 Turn the switch to ON to set the camcorder in CAMERA mode. The red CAMERA indicator will turn on. 3 Move the lens cover switch down to to open the lens cover. 4 Press Start/Stop to begin recording. • The recording starts; press Start/Stop again to pause the recording. • The DISC access indicator will flash while recording and will stay on briefly after pausing while the scene is recorded on the disc. WHEN YOU HAVE FINISHED RECORDING 1 Make sure that the DISC access indicator is off. 2 Turn off the camcorder. 3 Close the lens cover and the LCD panel. 4 Remove the disc. IMPORTANT • When recording movies, try to get a calm, stable picture. Excessive camcorder movement while shooting and extensive use of fast zooms and panning can result in jittery scenes. In extreme cases, the playback of such scenes may result in visually induced motion sickness. If you experience such a reaction, immediately stop the playback and take a rest break as necessary. Video • 29
-
 1
1 -
2
-
3
-
4
-
5
-
6
-
7
-
8
-
9
-
10
-
11
-
12
-
13
-
14
-
15
-
16
-
17
-
18
-
19
-
20
-
21
-
22
-
23
-
 24
24 -
 25
25 -
 26
26 -
 27
27 -
 28
28 -
 29
29 -
 30
30 -
 31
31 -
 32
32 -
 33
33 -
 34
34 -
35
-
36
-
37
-
38
-
39
-
40
-
41
-
42
-
43
-
44
-
45
-
46
-
47
-
48
-
49
-
50
-
51
-
52
-
53
-
54
-
55
-
56
-
57
-
58
-
59
-
60
-
61
-
62
-
63
-
64
-
65
-
66
-
67
-
68
-
69
-
70
-
71
-
72
-
73
-
74
-
75
-
76
-
77
-
78
-
79
-
80
-
81
-
82
-
83
-
84
-
85
-
86
-
87
-
88
-
89
-
90
-
91
-
92
-
93
 |
 |