Canon FS300 FS30/FS31/FS300 Instruction Manual - Page 69
Setting Print Orders from the Index Screen
 |
View all Canon FS300 manuals
Add to My Manuals
Save this manual to your list of manuals |
Page 69 highlights
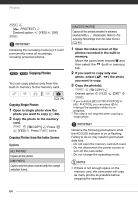
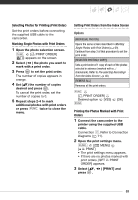
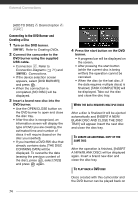
Selecting Photos for Printing (Print Order) Set the print orders before connecting the supplied USB cable to the camcorder. Marking Single Photos with Print Orders 1 Open the photo selection screen. FUNC. [ PRINT ORDER] appears on the screen. 2 Select ( ) the photo you want to mark with a print order. 3 Press to set the print order. The number of copies appears in orange. 4 Set ( ) the number of copies desired and press . To cancel the print order, set the number of copies to 0. 5 Repeat steps 2-4 to mark additional photos with print orders or press FUNC. twice to close the menu. Setting Print Orders from the Index Screen Options [INDIVIDUAL PHOTOS] Opens the same screen described in Marking Single Photos with Print Orders ( 69). Continue from step 3 of that procedure to set the print order. [SELECTED PHOTOS(1 COPY)] Sets a print order of 1 copy of each of the photos selected in advance (marked with a checkmark). Refer to Pre-selecting Recordings from the Index Screen ( 40). [REMOVE ALL] Removes all the print orders. FUNC. [ PRINT ORDER] Desired option [YES] FUNC. [OK] Printing the Photos Marked with Print Orders 1 Connect the camcorder to the printer using the supplied USB cable. Connection . Refer to Connection Diagrams ( 71). 2 Open the print settings menu. FUNC. [ MENU] [ PRINT] • The print settings menu appears. • If there are no photos marked with print orders, [SET PRINT ORDER] appears. 3 Select ( , press . ) [PRINT] and 69
-
 1
1 -
2
-
3
-
4
-
5
-
6
-
7
-
8
-
9
-
10
-
11
-
12
-
13
-
14
-
15
-
16
-
17
-
18
-
19
-
20
-
21
-
22
-
23
-
24
-
25
-
26
-
27
-
28
-
29
-
30
-
31
-
32
-
33
-
34
-
35
-
36
-
37
-
38
-
39
-
40
-
41
-
42
-
43
-
44
-
45
-
46
-
47
-
48
-
49
-
50
-
51
-
52
-
53
-
54
-
55
-
56
-
57
-
58
-
59
-
60
-
61
-
62
-
63
-
 64
64 -
 65
65 -
 66
66 -
 67
67 -
 68
68 -
 69
69 -
 70
70 -
 71
71 -
 72
72 -
 73
73 -
 74
74 -
75
-
76
-
77
-
78
-
79
-
80
-
81
-
82
-
83
-
84
-
85
-
86
-
87
-
88
-
89
-
90
-
91
-
92
-
93
-
94
-
95
-
96
-
97
-
98
-
99
-
100
-
101
-
102
-
103
-
104
-
105
-
106
-
107
-
108
-
109
-
110
-
111
-
112
-
113
-
114
-
115
-
116
 |
 |
