Canon MP730 MultiPASS MP730 User's Guide - Page 59
Entering the sender information
 |
UPC - 013803031683
View all Canon MP730 manuals
Add to My Manuals
Save this manual to your list of manuals |
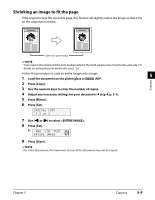
Page 59 highlights
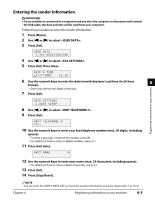
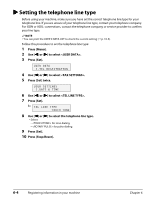
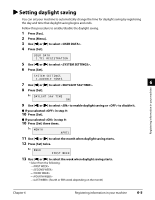
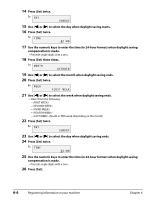
Entering the sender information IMPORTANT • If your machine is connected to a computer and you start the computer or disconnect and connect the USB cable, the date and time will be read from your computer. Follow this procedure to enter the sender information: 1 Press [Menu]. 2 Use [2] or [3] to select . 3 Press [Set]. USER DATA 1.TEL REGISTRATION 4 Use [2] or [3] to select . 5 Press [Set] three times. DATE & TIME 12/27/2003 15:10 6 Use the numeric keys to enter the date (month/day/year) and time (in 24-hour 6 format). • Enter only the last two digits of the year. 7 Press [Set]. Registering information in your machine USER SETTINGS 2.DATE SETUP 8 Use [2] or [3] to select . 9 Press [Set]. UNIT TELEPHONE # TEL= 10 Use the numeric keys to enter your fax/telephone number (max. 20 digits, including spaces). • To enter a plus sign (+) before the number, press [#]. • For details on how to enter or delete numbers, see p. 6-1. 11 Press [Set] twice. UNIT NAME :A 12 Use the numeric keys to enter your name (max. 24 characters, including spaces). • For details on how to enter or delete characters, see p. 6-1. 13 Press [Set]. 14 Press [Stop/Reset]. NOTE • You can print the USER'S DATA LIST to check the sender information you have registered ( p. 10-5). Chapter 6 Registering information in your machine 6-3
-
 1
1 -
2
-
3
-
4
-
5
-
6
-
7
-
8
-
9
-
10
-
11
-
12
-
13
-
14
-
15
-
16
-
17
-
18
-
19
-
20
-
21
-
22
-
23
-
24
-
25
-
26
-
27
-
28
-
29
-
30
-
31
-
32
-
33
-
34
-
35
-
36
-
37
-
38
-
39
-
40
-
41
-
42
-
43
-
44
-
45
-
46
-
47
-
48
-
49
-
50
-
51
-
52
-
53
-
 54
54 -
 55
55 -
 56
56 -
 57
57 -
 58
58 -
 59
59 -
 60
60 -
 61
61 -
 62
62 -
 63
63 -
 64
64 -
65
-
66
-
67
-
68
-
69
-
70
-
71
-
72
-
73
-
74
-
75
-
76
-
77
-
78
-
79
-
80
-
81
-
82
-
83
-
84
-
85
-
86
-
87
-
88
-
89
-
90
-
91
-
92
-
93
-
94
-
95
-
96
-
97
-
98
-
99
-
100
-
101
-
102
-
103
-
104
-
105
-
106
-
107
-
108
-
109
-
110
-
111
-
112
-
113
-
114
-
115
-
116
-
117
-
118
-
119
-
120
-
121
-
122
-
123
-
124
-
125
-
126
-
127
-
128
-
129
-
130
-
131
-
132
-
133
-
134
-
135
-
136
-
137
-
138
-
139
-
140
-
141
-
142
 |
 |
