Canon MX700 MX700 series Quick Start Guide - Page 7
Coded Dial button, Feed Switch button - error codes
 |
UPC - 013803081336
View all Canon MX700 manuals
Add to My Manuals
Save this manual to your list of manuals |
Page 7 highlights
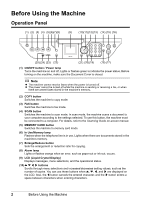
(11) OK button Finalizes your selection for the menu or setting item. Dismisses the error message and resumes the machine's normal operation after resolving a printing error or removing jammed paper. Ejects documents remaining in the ADF. (12) Menu button Accesses the menus and settings to customize operation of your machine. (13) Numeric buttons Enter numerical values such as the number of copies, as well as fax/telephone numbers and characters. (14) Redial/Pause button Redials the last number called using the Numeric buttons. Also enters pauses between or after numbers when dialing or registering numbers. (15) Black button Starts black & white copying, scanning, or faxing. (16) Stop/Reset button Cancels operations such as copying, scanning, or faxing, or a print job in progress. (17) Color button Starts color copying, photo printing, scanning, or faxing. (18) Coded Dial button Press this button and a two-digit code to dial a pre-registered fax/telephone number. (19) Tone button Switches temporarily to tone dialing. Also changes the mode when entering characters. (20) Settings button Configures the page size, media type, and image correction settings. (21) Back button Returns the LCD to the previous screen. (22) FAX Quality button Sets the scan contrast and resolution of the fax you are sending. (23) Feed Switch button Selects the paper source. Press to switch the paper source between the Rear Tray and the Front Tray. (24) Front Tray lamp Lights up when the Front Tray is the paper source. (25) Rear Tray lamp Lights up when the Rear Tray is the paper source. Before Using the Machine 3
-
 1
1 -
 2
2 -
 3
3 -
 4
4 -
 5
5 -
 6
6 -
 7
7 -
 8
8 -
 9
9 -
 10
10 -
 11
11 -
 12
12 -
13
-
14
-
15
-
16
-
17
-
18
-
19
-
20
-
21
-
22
-
23
-
24
-
25
-
26
-
27
-
28
-
29
-
30
-
31
-
32
-
33
-
34
-
35
-
36
-
37
-
38
-
39
-
40
-
41
-
42
-
43
-
44
-
45
-
46
-
47
-
48
-
49
-
50
-
51
-
52
-
53
-
54
-
55
-
56
-
57
-
58
-
59
-
60
-
61
-
62
-
63
-
64
-
65
-
66
-
67
-
68
-
69
-
70
-
71
-
72
-
73
-
74
-
75
-
76
-
77
-
78
-
79
-
80
-
81
-
82
-
83
-
84
-
85
-
86
-
87
-
88
-
89
-
90
-
91
-
92
-
93
-
94
-
95
-
96
-
97
-
98
-
99
-
100
-
101
-
102
-
103
-
104
-
105
-
106
-
107
-
108
-
109
-
110
-
111
-
112
-
113
-
114
-
115
-
116
-
117
-
118
-
119
-
120
-
121
-
122
-
123
-
124
-
125
-
126
-
127
-
128
-
129
-
130
-
131
-
132
-
133
-
134
-
135
-
136
-
137
-
138
-
139
-
140
-
141
-
142
-
143
-
144
-
145
-
146
-
147
-
148
-
149
-
150
-
151
-
152
 |
 |