Canon MX700 MX700 series Quick Start Guide - Page 88
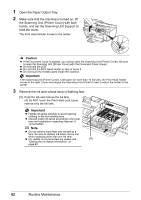
Important, Caution - print head replacement
 |
UPC - 013803081336
View all Canon MX700 manuals
Add to My Manuals
Save this manual to your list of manuals |
Page 88 highlights
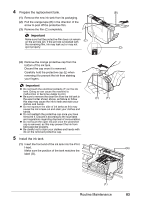
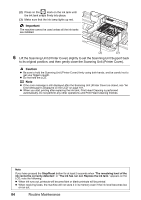
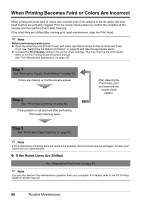
(2) Press on the mark on the ink tank until the ink tank snaps firmly into place. (3) Make sure that the ink lamp lights up red. Important The machine cannot be used unless all the ink tanks are installed. (3) (2) 6 Lift the Scanning Unit (Printer Cover) slightly to set the Scanning Unit Support back to its original position, and then gently close the Scanning Unit (Printer Cover). Caution z Be sure to hold the Scanning Unit (Printer Cover) firmly using both hands, and be careful not to get your fingers caught. z Do not hold the LCD. Note z If the error message is still displayed after the Scanning Unit (Printer Cover) is closed, see "An Error Message Is Displayed on the LCD" on page 101. z When you start printing after replacing the ink tank, Print Head Cleaning is performed automatically. Do not perform any other operations until Print Head Cleaning finishes. Note If you have pressed the Stop/Reset button for at least 5 seconds when "The remaining level of the ink cannot be correctly detected." or "The ink has run out. Replace the ink tank." appears on the LCD, note the following. z When ink runs out, printouts will become faint or blank printouts will be printed. z When receiving faxes, the machine will not store it in its memory even if the ink level becomes low or run out. 84 Routine Maintenance
-
 1
1 -
2
-
3
-
4
-
5
-
6
-
7
-
8
-
9
-
10
-
11
-
12
-
13
-
14
-
15
-
16
-
17
-
18
-
19
-
20
-
21
-
22
-
23
-
24
-
25
-
26
-
27
-
28
-
29
-
30
-
31
-
32
-
33
-
34
-
35
-
36
-
37
-
38
-
39
-
40
-
41
-
42
-
43
-
44
-
45
-
46
-
47
-
48
-
49
-
50
-
51
-
52
-
53
-
54
-
55
-
56
-
57
-
58
-
59
-
60
-
61
-
62
-
63
-
64
-
65
-
66
-
67
-
68
-
69
-
70
-
71
-
72
-
73
-
74
-
75
-
76
-
77
-
78
-
79
-
80
-
81
-
82
-
 83
83 -
 84
84 -
 85
85 -
 86
86 -
 87
87 -
 88
88 -
 89
89 -
 90
90 -
 91
91 -
 92
92 -
 93
93 -
94
-
95
-
96
-
97
-
98
-
99
-
100
-
101
-
102
-
103
-
104
-
105
-
106
-
107
-
108
-
109
-
110
-
111
-
112
-
113
-
114
-
115
-
116
-
117
-
118
-
119
-
120
-
121
-
122
-
123
-
124
-
125
-
126
-
127
-
128
-
129
-
130
-
131
-
132
-
133
-
134
-
135
-
136
-
137
-
138
-
139
-
140
-
141
-
142
-
143
-
144
-
145
-
146
-
147
-
148
-
149
-
150
-
151
-
152
 |
 |