Canon Optura 40 DV NETWORK SOLUTION DISK Ver.2 Software Instruction Manual - Page 43
Function Buttons 8 above
 |
UPC - 013803040906
View all Canon Optura 40 manuals
Add to My Manuals
Save this manual to your list of manuals |
Page 43 highlights
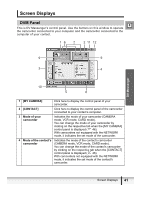
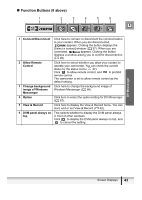
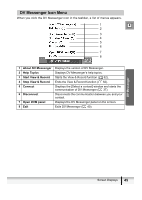
„ Function Buttons (8 above) 1 2 3 4 5 6 E DV Messenger 1 Connect/Disconnect Click here to connect or disconnect the communication to your contact. When you are disconnected, appears. Clicking the button displays the [Select a contact] window ( 37). When you are connected, appears. Clicking the button displays a window asking you to confirm disconnection ( 40). 2 Allow Remote Control Click here to select whether you allow your contact to operate your camcorder. You can check the current status by the status icons ( 42). Click to allow remote control, and to prohibit remote control. The camcorder is set to allow remote control as the default setting. 3 Change background Click here to change the background image of image of Windows Windows Messenger ( 66). Messenger 4 Option Click here to select the option setting for DV Messenger ( 67). 5 View & Record Click here to display the View & Record menu. You can start, end or set View & Record ( 62). 6 DVM panel always on This selects whether to display the DVM panel always top in front of other windows. Click to display the DVM panel always on top, and to cancel the setting. Screen Displays 43
-
 1
1 -
2
-
3
-
4
-
5
-
6
-
7
-
8
-
9
-
10
-
11
-
12
-
13
-
14
-
15
-
16
-
17
-
18
-
19
-
20
-
21
-
22
-
23
-
24
-
25
-
26
-
27
-
28
-
29
-
30
-
31
-
32
-
33
-
34
-
35
-
36
-
37
-
 38
38 -
 39
39 -
 40
40 -
 41
41 -
 42
42 -
 43
43 -
 44
44 -
 45
45 -
 46
46 -
 47
47 -
 48
48 -
49
-
50
-
51
-
52
-
53
-
54
-
55
-
56
-
57
-
58
-
59
-
60
-
61
-
62
-
63
-
64
-
65
-
66
-
67
-
68
-
69
-
70
-
71
-
72
-
73
-
74
-
75
-
76
-
77
-
78
-
79
-
80
-
81
-
82
-
83
-
84
-
85
-
86
-
87
-
88
-
89
-
90
-
91
-
92
-
93
 |
 |
