Canon Optura 40 DV NETWORK SOLUTION DISK Ver.2 Software Instruction Manual - Page 63
Starting View & Record
 |
UPC - 013803040906
View all Canon Optura 40 manuals
Add to My Manuals
Save this manual to your list of manuals |
Page 63 highlights
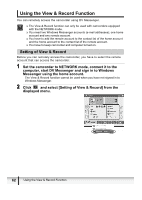
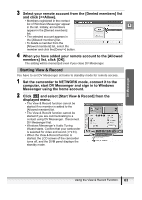
3 Select your remote account from the [Denied members] list and click [] button. 4 When you have added your remote account to the [Allowed members] list, click [OK]. The setting will be memorized even if you close DV Messenger. DV Messenger Starting View & Record You have to set DV Messenger at home to standby mode for remote access. 1 Set the camcorder to NETWORK mode, connect it to the computer, start DV Messenger and sign in to Windows Messenger using the home account. 2 Click and select [Start View & Record] from the displayed menu. • The View & Record function cannot be started if no member is added to the [Allowed member] list. • The View & Record function cannot be started if you are communicating to a contact using DV Messenger. Disconnect DV Messenger first. • Windows Messenger's Audio Tuning Wizard starts. Confirm that your camcorder is selected for video and sound ( 34). • When the View & Record function is started, the LCD screen of the camcorder turns off, and the DVM panel displays the standby mode. Using the View & Record Function 63
-
 1
1 -
2
-
3
-
4
-
5
-
6
-
7
-
8
-
9
-
10
-
11
-
12
-
13
-
14
-
15
-
16
-
17
-
18
-
19
-
20
-
21
-
22
-
23
-
24
-
25
-
26
-
27
-
28
-
29
-
30
-
31
-
32
-
33
-
34
-
35
-
36
-
37
-
38
-
39
-
40
-
41
-
42
-
43
-
44
-
45
-
46
-
47
-
48
-
49
-
50
-
51
-
52
-
53
-
54
-
55
-
56
-
57
-
 58
58 -
 59
59 -
 60
60 -
 61
61 -
 62
62 -
 63
63 -
 64
64 -
 65
65 -
 66
66 -
 67
67 -
 68
68 -
69
-
70
-
71
-
72
-
73
-
74
-
75
-
76
-
77
-
78
-
79
-
80
-
81
-
82
-
83
-
84
-
85
-
86
-
87
-
88
-
89
-
90
-
91
-
92
-
93
 |
 |
