Canon PIXMA MP210 MP210 series Quick Start Guide - Page 55
Cause, Action, For Plain Paper, For Other Paper - won t reset
 |
View all Canon PIXMA MP210 manuals
Add to My Manuals
Save this manual to your list of manuals |
Page 55 highlights
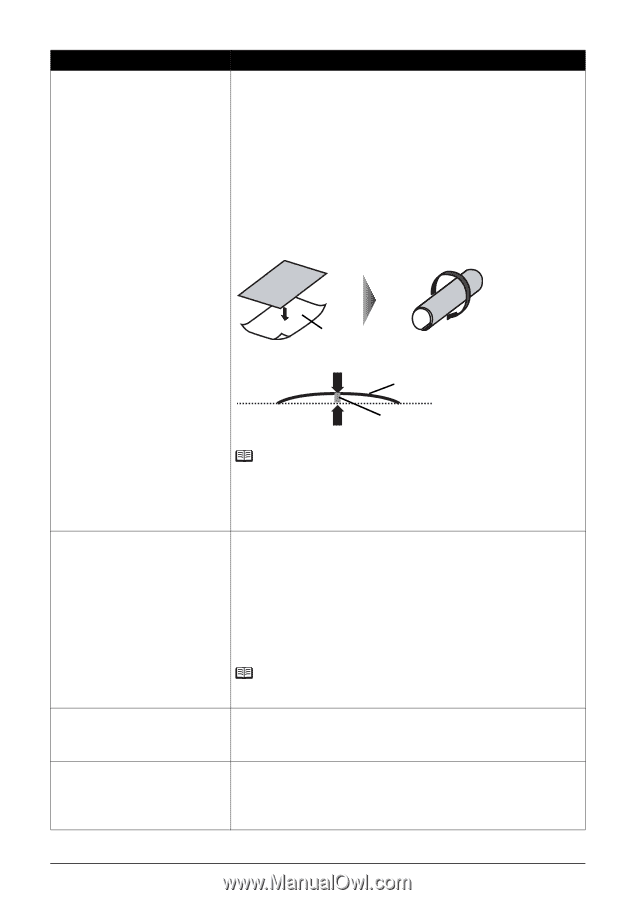
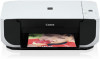
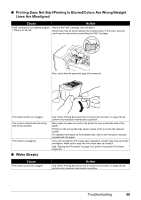
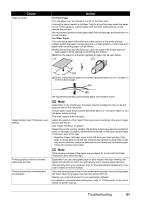
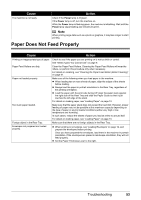
Cause Paper is curled. Action For Plain Paper Turn the paper over and reload it to print on the other side. Leaving the paper loaded in the Rear Tray for a long time may cause the paper to curl. If this happens, load the paper with the other side facing up. It may resolve the problem. We recommend putting unused paper back into the package and keep them on a level surface. For Other Paper If you are using paper with either any of the corners or the whole printing surface curled, the paper may become dirty, not feed properly, or both. Use such paper after correcting paper curl as follows. (1)With the printing side (A) facing up, cover the paper with a fresh sheet of plain paper to avoid staining or scratching the surface. (2)Roll up the paper in a direction opposite to paper curl as seen below. (1) (2) (A) (3)Check to see that the paper curl is within approximately 0.08 to 0.2 inches / 2 to 5 mm (B) in height. (A) Inappropriate Paper Thickness Lever setting. Printing graphics with the intensity setting set too high. Printing beyond the recommended printing area. (B) We recommend printing curl-corrected paper one sheet at a time. Note Depending on the media type, the paper may be smudged or may not be fed properly even if it is not curled. In such case, follow the procedure described above in "For Other Paper" to curl the paper before printing. This may improve the print result. Adjust the position of the Paper Thickness Lever according to the type of paper you are printing on. See "Paper Handling" on page 8. Depending on the printing content, the printing surface may become scratched even for the types of paper to set the lever to the left. In this case, set the Paper Thickness Lever to the right. * Reset the Paper Thickness Lever to the left when you finish printing. If the lever is not set back to the left, the inside of the machine is more likely to get dirty due to the wider clearance between the print head and the loaded paper. It may also reduce print quality. Note If the corners or edges of the paper are smudged, try to print with the Paper Thickness Lever set to the right. Especially if you are using plain paper to print images with high intensity, the paper may absorb too much ink and become wavy, causing paper abrasion. When printing from your computer, refer to "Print Results Not Satisfactory" in the User's Guide on-screen manual. If you are printing beyond the recommended printing area of your printing paper, the lower edge of the paper may become stained with ink. Resize your original document in your application software. For details on recommended printing area, refer to "Printing Area" in the User's Guide on-screen manual. Troubleshooting 51
-
 1
1 -
2
-
3
-
4
-
5
-
6
-
7
-
8
-
9
-
10
-
11
-
12
-
13
-
14
-
15
-
16
-
17
-
18
-
19
-
20
-
21
-
22
-
23
-
24
-
25
-
26
-
27
-
28
-
29
-
30
-
31
-
32
-
33
-
34
-
35
-
36
-
37
-
38
-
39
-
40
-
41
-
42
-
43
-
44
-
45
-
46
-
47
-
48
-
49
-
 50
50 -
 51
51 -
 52
52 -
 53
53 -
 54
54 -
 55
55 -
 56
56 -
 57
57 -
 58
58 -
 59
59 -
 60
60 -
61
-
62
-
63
-
64
-
65
-
66
-
67
-
68
-
69
-
70
-
71
-
72
-
73
-
74
-
75
-
76
-
77
-
78
-
79
-
80
 |
 |