Canon RM-25 V1.0 Network Video Recording Software RM Series Administrator s Ma - Page 103
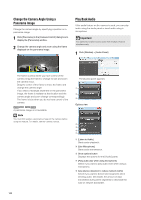
Compensate for Dark Regions in the Image, Silence Detection Settings
 |
View all Canon RM-25 V1.0 manuals
Add to My Manuals
Save this manual to your list of manuals |
Page 103 highlights
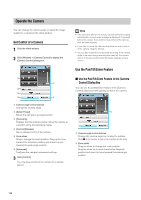
Operate the Camera ➅ [Settings] Displays the [Silence Detection Settings] dialog box. ➆ Hide options button Hides the options of the [Audio] panel. Compensate for Dark Regions in the Image Use the viewer shade control to compensate for any dark regions in the image. Cannot send live audio from the RM Viewer. To send live audio, use the Administrator Viewer included with the camera. 1 Click the video window menu button to display the menu. 2 Click [Viewer Shade Control] and select the amount of shade from the submenu. „ Silence Detection Settings Select the [Use silence detection to reduce network • [Off] Disable the shade control. 6 traffic] check box on the [Audio] panel to set the silence • [Low]/[Medium]/[High]/[Very High] detection sensitivity. Enable the shade control. View the video window and Click [Settings] to display the [Silence Detection Settings] select a compensation value that gives the appropriate dialog box and adjust the silence detection sensitivity. brightness. Day-to-Day Operations Note • You cannot apply this feature to more than one video window. • The viewer shade control is a feature of the Viewer, not the camera. Therefore, it can be used for both live and recorded video playback. ➀ [Use the default sensitivity settings] Uses the default sensitivity for silence detection. ➁ [Set the sensitivity manually] Drag the slider to set the detection sensitivity. ➂ [OK] and [Cancel] Close the dialog box. 103
-
 1
1 -
2
-
3
-
4
-
5
-
6
-
7
-
8
-
9
-
10
-
11
-
12
-
13
-
14
-
15
-
16
-
17
-
18
-
19
-
20
-
21
-
22
-
23
-
24
-
25
-
26
-
27
-
28
-
29
-
30
-
31
-
32
-
33
-
34
-
35
-
36
-
37
-
38
-
39
-
40
-
41
-
42
-
43
-
44
-
45
-
46
-
47
-
48
-
49
-
50
-
51
-
52
-
53
-
54
-
55
-
56
-
57
-
58
-
59
-
60
-
61
-
62
-
63
-
64
-
65
-
66
-
67
-
68
-
69
-
70
-
71
-
72
-
73
-
74
-
75
-
76
-
77
-
78
-
79
-
80
-
81
-
82
-
83
-
84
-
85
-
86
-
87
-
88
-
89
-
90
-
91
-
92
-
93
-
94
-
95
-
96
-
97
-
 98
98 -
 99
99 -
 100
100 -
 101
101 -
 102
102 -
 103
103 -
 104
104 -
 105
105 -
 106
106 -
 107
107 -
 108
108 -
109
-
110
-
111
-
112
-
113
-
114
-
115
-
116
-
117
-
118
-
119
-
120
-
121
-
122
-
123
-
124
-
125
-
126
-
127
-
128
-
129
-
130
-
131
-
132
-
133
-
134
-
135
-
136
-
137
-
138
 |
 |
