Canon RM-25 V1.0 Network Video Recording Software RM Series Administrator s Ma - Page 83
Configuring a Preset Tour, Select [Preset Tour] in the [Camera Angle] settings
 |
View all Canon RM-25 V1.0 manuals
Add to My Manuals
Save this manual to your list of manuals |
Page 83 highlights
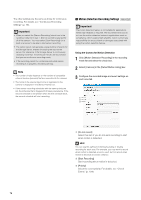
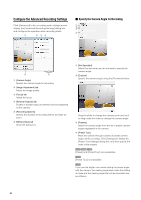
Record on a Regular Basis (Repeating Weekly Schedules) Configuring a Preset Tour If you initialize the head position (the camera points the Select [Preset Tour] in the [Camera Angle] settings and head forward, reinitializes, and then returns the head to specify the order of the presets that are registered in the the former position) during recording, the image during camera. the movement of the head will also be recorded. 1 Click [Settings] to display the [Preset Tour Settings] dialog box. When an external camera is connected and [Use External Video Input] is enabled, the settings on this dialog box are unavailable. 5 Note Setting a Recording Schedule • Clicking the [Settings] button alone does not perform a preset tour. You must first configure the settings in the [Preset Tour Settings] dialog box. • You are not able to specify preset and camera angles when configuring the intelligent function or motion detection settings, or when configuring multiple cameras. • To be able to select [Preset] or [Preset tour], you must first register camera angle presets on the camera. For details, see the camera manual. 2 Click [Add] to open the [Edit Preset Tour] dialog box. 3 Select a preset from the [Preset] list. 4 Configure the speed and pause settings using the sliders ([Speed (PT)], [Speed (Z)], and [Pause (sec)]). 5 Click [OK]. 6 Repeat steps 2 to 5 for additional presets. 7 Specify the order of the presets. The tour starts with the first preset and proceeds down the list. Change the order by selecting a preset, and then clicking [Move Up] or [Move Down]. To remove a preset, select the preset and click [Remove]. To edit a preset in the list, select the preset and click [Edit]. 83
-
 1
1 -
2
-
3
-
4
-
5
-
6
-
7
-
8
-
9
-
10
-
11
-
12
-
13
-
14
-
15
-
16
-
17
-
18
-
19
-
20
-
21
-
22
-
23
-
24
-
25
-
26
-
27
-
28
-
29
-
30
-
31
-
32
-
33
-
34
-
35
-
36
-
37
-
38
-
39
-
40
-
41
-
42
-
43
-
44
-
45
-
46
-
47
-
48
-
49
-
50
-
51
-
52
-
53
-
54
-
55
-
56
-
57
-
58
-
59
-
60
-
61
-
62
-
63
-
64
-
65
-
66
-
67
-
68
-
69
-
70
-
71
-
72
-
73
-
74
-
75
-
76
-
77
-
 78
78 -
 79
79 -
 80
80 -
 81
81 -
 82
82 -
 83
83 -
 84
84 -
 85
85 -
 86
86 -
 87
87 -
 88
88 -
89
-
90
-
91
-
92
-
93
-
94
-
95
-
96
-
97
-
98
-
99
-
100
-
101
-
102
-
103
-
104
-
105
-
106
-
107
-
108
-
109
-
110
-
111
-
112
-
113
-
114
-
115
-
116
-
117
-
118
-
119
-
120
-
121
-
122
-
123
-
124
-
125
-
126
-
127
-
128
-
129
-
130
-
131
-
132
-
133
-
134
-
135
-
136
-
137
-
138
 |
 |
