Canon s2is PowerShot S2 IS Camera User Guide - Page 142
Connect the Stereo/Video - is digital camera instructions
 |
UPC - 013803051629
View all Canon s2is manuals
Add to My Manuals
Save this manual to your list of manuals |
Page 142 highlights
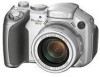
2 Connect the Stereo/Video Cable to the camera's A/V OUT terminal. z With your fingernail on the left edge of the camera's DIGITAL terminal cover, pull it forward to open it, and plug the Stereo/Video Cable in all the way. z Treat the connector area with great care when plugging and unplugging the cable. 3 Plug the other ends of the Stereo/Video Cable into the VIDEO IN and AUDIO IN jacks on the TV. To the Video In Jack Plug (Yellow) To the Audio In Jack Plug (Left) (White) To the Audio In Jack Plug (Right) (Red) 4 Turn on the TV and switch it to Video mode. 5 Power on the camera in Shooting mode or Playback mode (p. 23). z The image will appear on the TV. Shoot or play back images as usual. z Press the DISP. button when images are not being displayed on the TV when shooting. ‹ No image will appear on the LCD monitor (or viewfinder) when the camera is connected to a TV monitor. ‹ Refer to p. 80, for instructions regarding the video output signal. ‹ A TV set cannot be used in the (Stitch Assist) mode. 140
-
 1
1 -
2
-
3
-
4
-
5
-
6
-
7
-
8
-
9
-
10
-
11
-
12
-
13
-
14
-
15
-
16
-
17
-
18
-
19
-
20
-
21
-
22
-
23
-
24
-
25
-
26
-
27
-
28
-
29
-
30
-
31
-
32
-
33
-
34
-
35
-
36
-
37
-
38
-
39
-
40
-
41
-
42
-
43
-
44
-
45
-
46
-
47
-
48
-
49
-
50
-
51
-
52
-
53
-
54
-
55
-
56
-
57
-
58
-
59
-
60
-
61
-
62
-
63
-
64
-
65
-
66
-
67
-
68
-
69
-
70
-
71
-
72
-
73
-
74
-
75
-
76
-
77
-
78
-
79
-
80
-
81
-
82
-
83
-
84
-
85
-
86
-
87
-
88
-
89
-
90
-
91
-
92
-
93
-
94
-
95
-
96
-
97
-
98
-
99
-
100
-
101
-
102
-
103
-
104
-
105
-
106
-
107
-
108
-
109
-
110
-
111
-
112
-
113
-
114
-
115
-
116
-
117
-
118
-
119
-
120
-
121
-
122
-
123
-
124
-
125
-
126
-
127
-
128
-
129
-
130
-
131
-
132
-
133
-
134
-
135
-
136
-
 137
137 -
 138
138 -
 139
139 -
 140
140 -
 141
141 -
 142
142 -
 143
143 -
 144
144 -
 145
145 -
 146
146 -
 147
147 -
148
-
149
-
150
-
151
-
152
-
153
-
154
-
155
-
156
-
157
-
158
-
159
-
160
-
161
-
162
-
163
-
164
-
165
-
166
-
167
-
168
-
169
-
170
-
171
-
172
-
173
-
174
-
175
-
176
-
177
-
178
-
179
-
180
-
181
-
182
-
183
-
184
-
185
-
186
-
187
 |
 |
