Canon s2is PowerShot S2 IS Camera User Guide - Page 94
Setting a Custom White Balance
 |
UPC - 013803051629
View all Canon s2is manuals
Add to My Manuals
Save this manual to your list of manuals |
Page 94 highlights
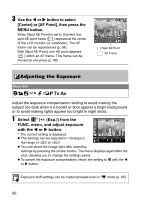
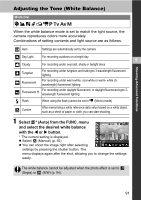
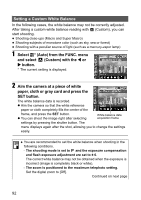
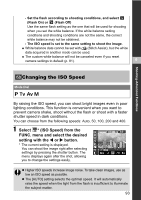
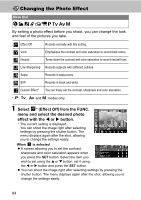
Setting a Custom White Balance In the following cases, the white balance may not be correctly adjusted. After taking a custom white balance reading with (Custom), you can start shooting. z Shooting close-ups (Macro and Super Macro) z Shooting subjects of monotone color (such as sky, sea or forest) z Shooting with a peculiar source of light (such as a mercury-vapor lamp) 1 Select * (Auto) from the FUNC. menu and select (Custom) with the W or X button. * The current setting is displayed. 2 Aim the camera at a piece of white paper, cloth or gray card and press the SET button. The white balance data is recorded. z Aim the camera so that the white reference paper or cloth completely fills the center of the frame, and press the SET button. z You can shoot the image right after selecting White balance data acquisition frame settings by pressing the shutter button. The menu displays again after the shot, allowing you to change the settings easily. ‹ You are recommended to set the white balance when shooting in the following conditions. - The shooting mode is set to and the exposure compensation and flash exposure adjustment are set to ± 0. The correct white balance may not be obtained when the exposure is incorrect (image is completely black or white). - The zoom is positioned to the maximum telephoto setting. Set the digital zoom to [Off]. Continued on next page 92
-
 1
1 -
2
-
3
-
4
-
5
-
6
-
7
-
8
-
9
-
10
-
11
-
12
-
13
-
14
-
15
-
16
-
17
-
18
-
19
-
20
-
21
-
22
-
23
-
24
-
25
-
26
-
27
-
28
-
29
-
30
-
31
-
32
-
33
-
34
-
35
-
36
-
37
-
38
-
39
-
40
-
41
-
42
-
43
-
44
-
45
-
46
-
47
-
48
-
49
-
50
-
51
-
52
-
53
-
54
-
55
-
56
-
57
-
58
-
59
-
60
-
61
-
62
-
63
-
64
-
65
-
66
-
67
-
68
-
69
-
70
-
71
-
72
-
73
-
74
-
75
-
76
-
77
-
78
-
79
-
80
-
81
-
82
-
83
-
84
-
85
-
86
-
87
-
88
-
 89
89 -
 90
90 -
 91
91 -
 92
92 -
 93
93 -
 94
94 -
 95
95 -
 96
96 -
 97
97 -
 98
98 -
 99
99 -
100
-
101
-
102
-
103
-
104
-
105
-
106
-
107
-
108
-
109
-
110
-
111
-
112
-
113
-
114
-
115
-
116
-
117
-
118
-
119
-
120
-
121
-
122
-
123
-
124
-
125
-
126
-
127
-
128
-
129
-
130
-
131
-
132
-
133
-
134
-
135
-
136
-
137
-
138
-
139
-
140
-
141
-
142
-
143
-
144
-
145
-
146
-
147
-
148
-
149
-
150
-
151
-
152
-
153
-
154
-
155
-
156
-
157
-
158
-
159
-
160
-
161
-
162
-
163
-
164
-
165
-
166
-
167
-
168
-
169
-
170
-
171
-
172
-
173
-
174
-
175
-
176
-
177
-
178
-
179
-
180
-
181
-
182
-
183
-
184
-
185
-
186
-
187
 |
 |
