Canon s2is PowerShot S2 IS Camera User Guide - Page 149
Selecting Images for Transferring
 |
UPC - 013803051629
View all Canon s2is manuals
Add to My Manuals
Save this manual to your list of manuals |
Page 149 highlights
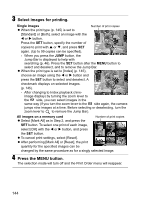
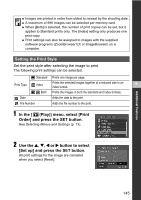
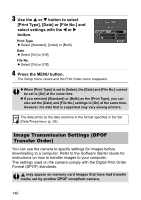
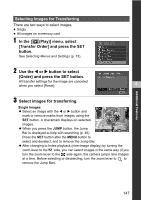
Selecting Images for Transferring There are two ways to select images. z Singly z All images on a memory card 1 In the [ (Play)] menu, select [Transfer Order] and press the SET button. See Selecting Menus and Settings (p. 73). 2 Use the W or X button to select [Order] and press the SET button. All transfer settings for the image are canceled when you select [Reset]. 9 3 Select images for transferring. Single Images z Select an image with the W or X button and mark or remove marks from images using the SET button. A checkmark displays on selected images. z When you press the JUMP button, the Jump Bar is displayed to help with searching (p. 46). Press the SET button after the MENU button to select and deselect, and to remove the Jump Bar. z After changing to Index playback (nine-image display) by turning the zoom lever to the side, you can select images in the same way (if you turn the zoom lever to the side again, the camera jumps nine images at a time. Before selecting or deselecting, turn the zoom lever to to remove the Jump Bar). Additional Features 147
-
 1
1 -
2
-
3
-
4
-
5
-
6
-
7
-
8
-
9
-
10
-
11
-
12
-
13
-
14
-
15
-
16
-
17
-
18
-
19
-
20
-
21
-
22
-
23
-
24
-
25
-
26
-
27
-
28
-
29
-
30
-
31
-
32
-
33
-
34
-
35
-
36
-
37
-
38
-
39
-
40
-
41
-
42
-
43
-
44
-
45
-
46
-
47
-
48
-
49
-
50
-
51
-
52
-
53
-
54
-
55
-
56
-
57
-
58
-
59
-
60
-
61
-
62
-
63
-
64
-
65
-
66
-
67
-
68
-
69
-
70
-
71
-
72
-
73
-
74
-
75
-
76
-
77
-
78
-
79
-
80
-
81
-
82
-
83
-
84
-
85
-
86
-
87
-
88
-
89
-
90
-
91
-
92
-
93
-
94
-
95
-
96
-
97
-
98
-
99
-
100
-
101
-
102
-
103
-
104
-
105
-
106
-
107
-
108
-
109
-
110
-
111
-
112
-
113
-
114
-
115
-
116
-
117
-
118
-
119
-
120
-
121
-
122
-
123
-
124
-
125
-
126
-
127
-
128
-
129
-
130
-
131
-
132
-
133
-
134
-
135
-
136
-
137
-
138
-
139
-
140
-
141
-
142
-
143
-
 144
144 -
 145
145 -
 146
146 -
 147
147 -
 148
148 -
 149
149 -
 150
150 -
 151
151 -
 152
152 -
 153
153 -
 154
154 -
155
-
156
-
157
-
158
-
159
-
160
-
161
-
162
-
163
-
164
-
165
-
166
-
167
-
168
-
169
-
170
-
171
-
172
-
173
-
174
-
175
-
176
-
177
-
178
-
179
-
180
-
181
-
182
-
183
-
184
-
185
-
186
-
187
 |
 |
