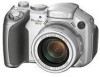
Canon s2is PowerShot S2 IS Camera User Guide - Page 96
Changing the Photo Effect - black screen
 |
UPC - 013803051629
View all Canon s2is manuals
Add to My Manuals
Save this manual to your list of manuals |
Page 96 highlights
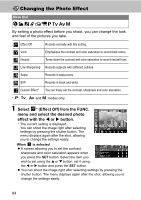
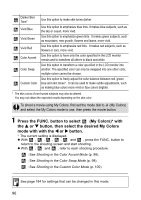
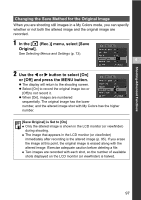
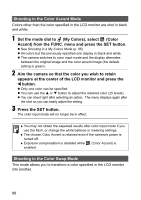
Changing the Photo Effect Mode Dial By setting a photo effect before you shoot, you can change the look and feel of the pictures you take. Effect Off Vivid Neutral Records normally with this setting. Emphasizes the contrast and color saturation to record bold colors. Tones down the contrast and color saturation to record neutral hues. Low Sharpening Records subjects with softened outlines. Sepia Records in sepia tones. B/W Records in black and white. Custom Effect* You can freely set the contrast, sharpness and color saturation. * , , and modes only 1 Select * (Effect Off) from the FUNC. menu and select the desired photo effect with the W or X button. * The current setting is displayed. You can shoot the image right after selecting settings by pressing the shutter button. The menu displays again after the shot, allowing you to change the settings easily. When is selected z A screen allowing you to set the contrast, sharpness and color saturation appears when you press the SET button. Select the item you wish to set using the S or T button, set it using the W or X button and press the SET button. z You can shoot the image right after selecting settings by pressing the shutter button. The menu displays again after the shot, allowing you to change the settings easily. 94
-
 1
1 -
2
-
3
-
4
-
5
-
6
-
7
-
8
-
9
-
10
-
11
-
12
-
13
-
14
-
15
-
16
-
17
-
18
-
19
-
20
-
21
-
22
-
23
-
24
-
25
-
26
-
27
-
28
-
29
-
30
-
31
-
32
-
33
-
34
-
35
-
36
-
37
-
38
-
39
-
40
-
41
-
42
-
43
-
44
-
45
-
46
-
47
-
48
-
49
-
50
-
51
-
52
-
53
-
54
-
55
-
56
-
57
-
58
-
59
-
60
-
61
-
62
-
63
-
64
-
65
-
66
-
67
-
68
-
69
-
70
-
71
-
72
-
73
-
74
-
75
-
76
-
77
-
78
-
79
-
80
-
81
-
82
-
83
-
84
-
85
-
86
-
87
-
88
-
89
-
90
-
 91
91 -
 92
92 -
 93
93 -
 94
94 -
 95
95 -
 96
96 -
 97
97 -
 98
98 -
 99
99 -
 100
100 -
 101
101 -
102
-
103
-
104
-
105
-
106
-
107
-
108
-
109
-
110
-
111
-
112
-
113
-
114
-
115
-
116
-
117
-
118
-
119
-
120
-
121
-
122
-
123
-
124
-
125
-
126
-
127
-
128
-
129
-
130
-
131
-
132
-
133
-
134
-
135
-
136
-
137
-
138
-
139
-
140
-
141
-
142
-
143
-
144
-
145
-
146
-
147
-
148
-
149
-
150
-
151
-
152
-
153
-
154
-
155
-
156
-
157
-
158
-
159
-
160
-
161
-
162
-
163
-
164
-
165
-
166
-
167
-
168
-
169
-
170
-
171
-
172
-
173
-
174
-
175
-
176
-
177
-
178
-
179
-
180
-
181
-
182
-
183
-
184
-
185
-
186
-
187
 |
 |
