Cisco SFS-7012 User Guide - Page 43
Installing the Switch Face Plate, Install the lower rear, mounting bracket to the ra
 |
View all Cisco SFS-7012 manuals
Add to My Manuals
Save this manual to your list of manuals |
Page 43 highlights
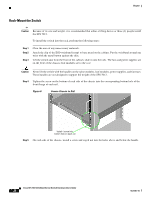
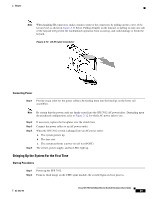
Chapter Figure 7 Secure Chassis to Rack Install 1 screw and caged nut into each hole above and below the handle Step 6 Using two screws, install the lower mounting bracket to the rail assembly and chassis as shown in Figure 8. Figure 8 Install the Lower Mounting Bracket and Heyclip Step 7 Step 8 Install the heyclip here Install the heyclip to the rail assembly. If applicable, reinstall the chassis fascia(s). Install the lower rear mounting bracket to the ra assembly and chassis Installing the Switch Face Plate To install the switch face plate(s): OL-8787-04 Cisco SFS 7012 InfiniBand Server Switch Hardware Users Guide 25
-
 1
1 -
2
-
3
-
4
-
5
-
6
-
7
-
8
-
9
-
10
-
11
-
12
-
13
-
14
-
15
-
16
-
17
-
18
-
19
-
20
-
21
-
22
-
23
-
24
-
25
-
26
-
27
-
28
-
29
-
30
-
31
-
32
-
33
-
34
-
35
-
36
-
37
-
 38
38 -
 39
39 -
 40
40 -
 41
41 -
 42
42 -
 43
43 -
 44
44 -
 45
45 -
 46
46 -
 47
47 -
 48
48 -
49
-
50
-
51
-
52
-
53
-
54
-
55
-
56
-
57
-
58
-
59
-
60
-
61
-
62
-
63
-
64
-
65
-
66
-
67
-
68
-
69
-
70
-
71
-
72
-
73
-
74
-
75
-
76
-
77
-
78
-
79
-
80
-
81
-
82
-
83
-
84
-
85
-
86
-
87
-
88
-
89
-
90
-
91
-
92
-
93
-
94
-
95
-
96
-
97
-
98
-
99
-
100
-
101
-
102
-
103
-
104
-
105
-
106
-
107
-
108
-
109
-
110
-
111
-
112
-
113
-
114
-
115
-
116
 |
 |

25
Cisco SFS 7012 InfiniBand Server Switch Hardware Users Guide
OL-8787-04
Chapter
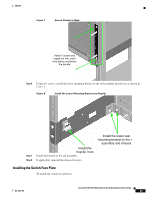
Figure 7
Secure Chassis to Rack
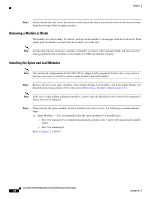
Step 6
Using two screws, install the lower mounting bracket to the rail assembly and chassis as shown in
Figure 8
.
Figure 8
Install the Lower Mounting Bracket and Heyclip
Step 7
Install the heyclip to the rail assembly.
Step 8
If applicable, reinstall the chassis
fascia(s).
Installing the Switch Face Plate
To install the switch face plate(s):
Install 1 screw and
caged nut into
each
hole above and below
the handle
Install the lower rear
mounting bracket to the ra
assembly and chassis
Install the
heyclip
here