Cisco WS-CBS3020-HPQ Installation Guide - Page 81
Troubleshooting, Diagnosing Problems, Verify Switch POST Results - password reset
 |
View all Cisco WS-CBS3020-HPQ manuals
Add to My Manuals
Save this manual to your list of manuals |
Page 81 highlights
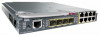
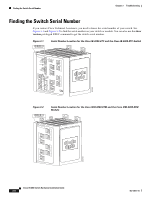
Troubleshooting 3 C H A P T E R This chapter provides these topics for troubleshooting problems: • Diagnosing Problems, page 3-1 • How to Clear the Switch IP Address and Configuration, page 3-5 • How to Recover Passwords, page 3-5 • Finding the Switch Serial Number, page 3-6 Diagnosing Problems The LEDs on the front panel provide troubleshooting information about the switch. They show power-on self-test (POST) failures, port-connectivity problems, and overall switch performance. You can also get statistics from the browser interface, the command-line interface (CLI), the Cisco Intelligence Engine 2100 (IE2100) Series Configuration Registrar, or a Simple Network Management Protocol (SNMP) workstation. See the switch software configuration guide, the switch command reference, or the documentation that came with your IE2100 or SNMP application for details. Verify Switch POST Results As the switch powers on, it begins the POST, a series of tests that runs automatically to ensure that the switch functions properly. It might take several minutes for the switch to complete POST. POST starts with LED tests that cycles once through the System, Alarm, Setup, Pwr A, and Pwr B LEDs. While POST proceeds, the System LED blinks green, and all the other LEDs remain off. If POST completes successfully, the System LED changes to solid green, and the other LEDs display their normal operating status. If the switch fails POST, the System LED turns red. Note POST failures are usually fatal. Contact your Cisco technical support representative if your switch does not pass POST. If you have a terminal connected to the console port, you can also view POST status and test results on the terminal. If the terminal displays garbled characters, you might need to reset the terminal-emulation software to 9600 bits per second. For more information about viewing results on a terminal, see the "Verify POST Results" section on page 2-22. OL-13017-01 Cisco IE 3000 Switch Hardware Installation Guide 3-1
-
 1
1 -
2
-
3
-
4
-
5
-
6
-
7
-
8
-
9
-
10
-
11
-
12
-
13
-
14
-
15
-
16
-
17
-
18
-
19
-
20
-
21
-
22
-
23
-
24
-
25
-
26
-
27
-
28
-
29
-
30
-
31
-
32
-
33
-
34
-
35
-
36
-
37
-
38
-
39
-
40
-
41
-
42
-
43
-
44
-
45
-
46
-
47
-
48
-
49
-
50
-
51
-
52
-
53
-
54
-
55
-
56
-
57
-
58
-
59
-
60
-
61
-
62
-
63
-
64
-
65
-
66
-
67
-
68
-
69
-
70
-
71
-
72
-
73
-
74
-
75
-
 76
76 -
 77
77 -
 78
78 -
 79
79 -
 80
80 -
 81
81 -
 82
82 -
 83
83 -
 84
84 -
 85
85 -
 86
86 -
87
-
88
-
89
-
90
-
91
-
92
-
93
-
94
-
95
-
96
-
97
-
98
-
99
-
100
-
101
-
102
-
103
-
104
-
105
-
106
-
107
-
108
-
109
-
110
-
111
-
112
-
113
-
114
-
115
-
116
-
117
-
118
-
119
-
120
-
121
-
122
-
123
-
124
-
125
-
126
-
127
-
128
-
129
-
130
-
131
-
132
-
133
-
134
-
135
-
136
-
137
-
138
-
139
-
140
-
141
-
142
-
143
-
144
-
145
-
146
-
147
-
148
-
149
-
150
-
151
-
152
-
153
-
154
-
155
-
156
-
157
-
158
-
159
-
160
-
161
-
162
-
163
-
164
-
165
-
166
-
167
-
168
-
169
-
170
 |
 |